Support FAQs
Getting started
Get in touch if you have an issue.
Support is a core part of the service we offer. Our team is here to help you succeed. Whatever you need, just ask and we'll help you get it done.
We never use bots, automated responses, or outsourced support staff.
The best way to get in touch with us is via our Intercom chat widget.
This can be found at the bottom-right of most pages and looks like this:
Click it, and you'll have the option to start a conversation with one of our team.
Additional contact
Although our live chat is the easiest and fastest way to get support (there's an icon at the bottom right), you can also email us at [email protected]
An overview of how we do billing at CrypAdvise
CrypAdvise is a VPS provider. We accept payment exclusively with Cryptocurrency and currently support Bitcoin, Ethereum and USDC through our own in-house payment processing service.
You'll maintain a balance on your CrypAdvise account, which we will deduct funds from once per hour to cover the cost of the services that you have provisioned.
Funding your account
The first step is to add funds to your account. You can do this by clicking on the (“+”) icon at the bottom of the sidebar. Or when purchasing a server plan.
An example
Let's say we want to provision the following server.
As you can see, the price is displayed hourly and monthly. The displayed monthly price is the maximum that you will pay for any given calendar month.
After provisioning this server, every hour from your balance will be written off the amount indicated as "per hour" but not more than the amount indicated as "per month" US dollars for the current calendar month. Billing then resumes again the following month.
An explanation of how cryptocurrency payments work with CrypAdvise
Making a payment
After creating an account you will need to fund your account. Funds sit in your account, represented as a USD balance. See our guide How does billing work? for more about that.
You must make a payment request ("+") each time you want to pay. The address will be different each time. To improve privacy, we never reuse addresses.
Which cryptocurrencies can I pay with?
We use our own payment system that has been developed in-house. This offers us the most flexibility and enables us to provide our customers with the best possible user experience and privacy when it comes to payments.
We currently directly support Bitcoin, Ethereum, and USDC.
If you'd like to pay with something else, you can use flyp.me to send straight to one of our addresses.
Privacy
As mentioned, we use our own payment processing solution. This enables us to limit what information we use to facilitate your transaction and means we don't need to rely on third parties.
However, as with all things privacy-related, it's best when you (the user) has control – and you do! Check out blockchair's excellent privacy-o-meter and the Bitcoin Wiki guide on privacy for tips on keeping your transactions private.
Fast transactions
The fee is an integral part of the process and is dictated by the network of the cryptocurrency that you choose to use. For your transaction to complete quickly you need to use a competitive fee so that your transaction is included in a block. We always include a recommended fee at the bottom of each payment invoice.
For Bitcoin, we accept zero-confirmation transactions under certain circumstances. Here are some tips to get a zero-conf instant transaction with CrypAdvise:
- Turn RBF off
- Send with at least our recommended fee (noted at the bottom of each invoice)
- Make sure you are not spending parent coins that are unconfirmed
Paying from an exchange
Paying from an exchange can sometimes take longer than sending directly from your wallet as they tend to batch-send transactions. Additionally, some exchanges take their fees from the intended sent amount which results in the invoice being underpaid. Generally, we don't see issues with this on the big exchanges. If you run into any issues just reach out to us for support and we'll be happy to help.
What if I underpay or overpay?
For underpaid transactions you'll see a message on your invoice link detailing the amount received, original amount, and the amount remaining. You can send the remaining amount to complete the payment and close the invoice. If the amount is too low to send or you have any issues, just reach out to us for support and we can credit the partial payment.
For overpaid transactions, contact us for support and we can arrange return or credit of funds.
My payment expired while it was in progress
Contact us to arrange return or credit of funds.
How email works on CrypAdvise and how to set RDNS
By default, emailing ports (SMTP) are blocked on new accounts. This is standard industry practice across our hosts as well as our own VPS service.
If you would like to send or receive email with your VPS, there are a few important points to note.
Emailing is enabled purely at our discretion based on the information you provide when requesting us to unblock SMTP ports for your server and account. If we decide that your use-case is valid then we can enable emailing for CrypAdvise and DigitalOcean servers swiftly.
Vultr and Linode require us to contact them to enable emailing on servers on a case-by-case basis. Enabling email is solely at their discretion and we usually require up to 48 hours to get this opened for you on a single server.
How to unblock email ports
Once you have made sure that your emailing is not against our terms and conditions and you would like us to enable emailing on your account, you can request email unblocking by contacting support and providing the following information:
- A brief overview on the purpose of your emailing.
- The quantity of emails you expect to send on a daily and monthly basis.
How to set rDNS
You can set rDNS on your CrypAdvise or DigitalOcean server by simply naming your server with your desired hostname. The server name must be a valid domain name for the PTR record to be set.
For Vultr and Linode, we can set rDNS but this is a manual process that must be completed by a member of the team.
What happens to your servers
Here's how we handle this scenario by default.
Please reach out to us on our support chat or by email if you'd like to make other arrangements or need more time to pay.
- We send the first email 7 days before the balance should reach 0. The second email the day before the balance should reach 0.
- Once your balance is 0 or below, we will leave your servers in a "stopped" state for 12 hours.
- After this point, we destroy servers permanently. Servers are not recoverable.
We're here to help – if this doesn't work for you, just let us know. Ultimately, we don't ever want to delete your servers. On the other hand, as a privacy-first service, we also don't want to have to keep copies if you're not around to pay. Email us or chat to our live support team if you have any further questions or concerns.
Connecting to your VPS
Connecting to your VPS using SSH
The most common way our users tend to utilize their VPS is from a Windows host to a Linux server. For this, we recommend a third-party tool called PuTTY. PuTTY is a free, open-source software that comes with several useful features.It can, for example, save your server IP for later use, generate SSH keys, and automatically mitigate common SSH server bugs. Connecting with PuTTY is as simple as downloading an installer from the official site, installing PuTTY, and entering your IP address in the session window.
Connect to a VPS via PuTTY
The most common way our users tend to utilize their VPS is from a Windows host to a Linux server. For this, we recommend a third-party tool called PuTTY. PuTTY is a free, open-source software that comes with several useful features.It can, for example, save your server IP for later use, generate SSH keys, and automatically mitigate common SSH server bugs. Connecting with PuTTY is as simple as downloading an installer from the official site, installing PuTTY, and entering your IP address in the session window.
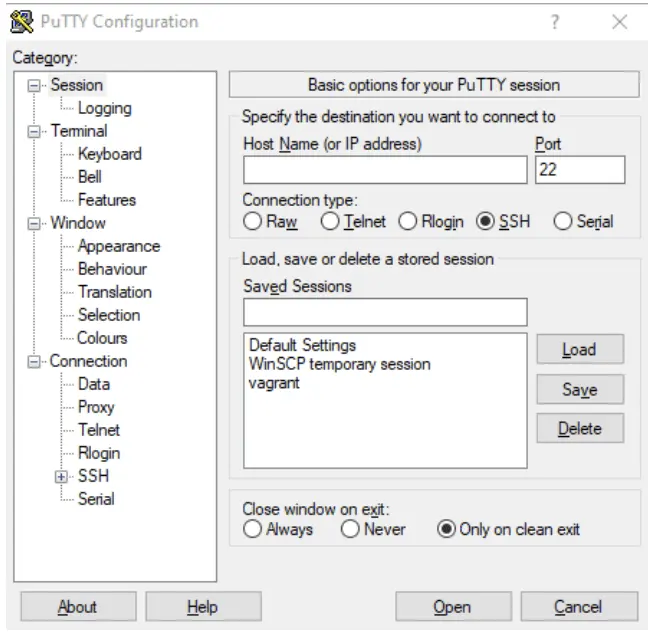
You can then click Open to connect to the server. PuTTY also works on Linux. To install PuTTY, enter the following in terminal:
sudo apt install puttyOnce PuTTY is installed, you can also utilize it to connect via an SSH key, store public keys, configure private keys, and more. Wondering how to make use of PuTTY's more advanced functionality? Read our full guide.
Connecting using Terminal
If you're familiar with the command line, connecting using SSH is a simple one line command.
Your password is the one entered when creating the server.
Connect to your Windows VPS using Remote Desktop from your Windows computer
Connecting to a Windows VPS (Virtual Private Server) using Windows own Remote Desktop Protocol (RDP) is relatively simple. This functionality to remotely connect to another computer is embedded into Windows Operating Systems.
Connecting to a Windows VPS is similar to connecting to any other Windows device. If you are familiar with the Windows interface, you should have little trouble with a VPS running Windows.
Connecting
Click on the Windows key, and type “Remote” and choose “Remote Desktop Connection” as shown below.
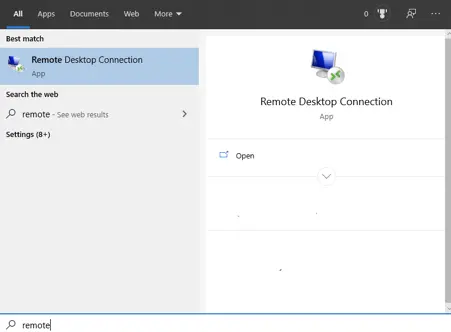
This will bring up a window that looks something like below.
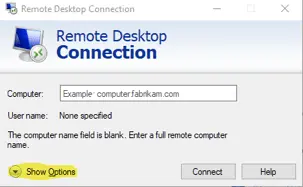
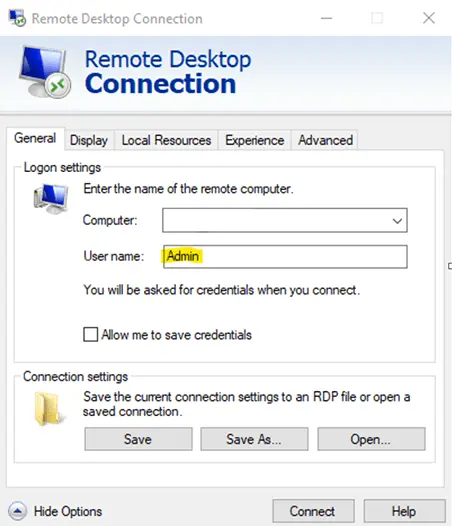
Click on “Show Options” to get a more detailed screen. Under “Computer” you will need to enter either the IP address for the remote computer, or its domain name (if you have it). Enter your User name, and click “Save” to save a copy of your connection. Then click on “Connect.”
You will then be prompted for the password associated with the user name you entered.
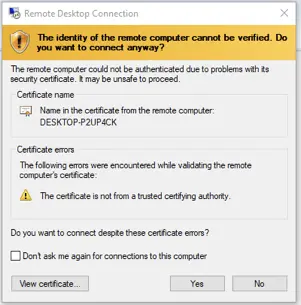
You may get a message like the below. You can just click “Yes” as it is your VPS.
Once you are in, you will see a Windows screen that looks much like the one below. Note that if the screen is maximized, you will be able to see the name of the computer or the IP address across the top bar, like so.

To disconnect and keep your session running, you can just click on the “X” at the top right of the screen. You will see a message that states the below.
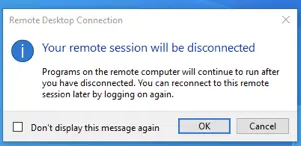
You can click “OK” in this window and leave whatever it is you need running on the remote machine (which is something you will typically wish to do). When you login the next time, you will see whatever software you left running still up on the machine.
Summary
You have now successfully set up your RDP connection to a remote Windows VPS. If you need to connect to it again in the future, simply fire up your Remote Desktop Connection, and you should see your connection already configured in the application.
Troubleshooting connection issues
Here are some tips if you're facing issues connecting to your VPS. If you get through these and are still facing issues, just share the results of these steps with our support team and we'll look in to it for you.
It's still setting up
Different distributions and operating systems require different lengths of time to get past their first-boot. If you have provisioned the VPS within the last 5 minutes, wait 5 minutes and try again.
Check that the host is reachable
Check https://port.ping.pe to see if the port is reachable from locations around the world. Input your servers IP address and port in to this tool as follows:

Where ipaddress is the IP of your server and port is the port you're trying to connect to: usually 22 for Linux (SSH) and 3389 for Windows (RDP).
Check the hosts status page
Maintenance is an unfortunate inevitability. Check the host status page to ensure that they are not executing planned or emergency maintenance in the region of your VPS:
Check your connection
Some VPNs and Tor exits block SSH port 22 (Linux) and/or RDP port 3389 (Windows). Try a different connection, especially if the above port.ping.pe test shows that the host is reachable.
Let us know if this helped! As always, reach out to our support team if you’re facing issues.
Connecting and managing your VPS with SSH
How to create an SSH key in Linux to use with your CrypAdvise VPS
When you create a VPS, you'll be asked if you'd like to add an SSH key to the server. While a little more cumbersome to set up than the usual password, this will ultimately greatly increase the security of your server with little inconvenience.
What is my SSH key?
The natural reaction when being asked to add an SSH key to a server is to wonder “what is my SSH key and where can I find it in my control panel?”. However, for technical and security reasons, CrypAdvise does not set up SSH for our users. Instead, you need to generate an SSH key yourself with a few simple commands.
For the unfamiliar, SSH keys are a set of 4069-bit matching cryptographic values which you can use to prove your identity to your server. They consist of two parts: a public SSH key and private SSH key, with the public key able to be shared with anyone and the private one kept firmly to yourself.
The public SSH key is used by the server to create and encrypt a random string that can only be unlocked by the private SSH key, which is saved on your local PC. If the client (your PC) is able to correctly decrypt this key, the server knows it's you and will therefore give access. Due to the sheer length of a private key, it's essentially impossible to brute force with current technology.
With that said, let's jump into how to create a private key and public key in the command line.
How to generate SSH keys
The first step is to create an SSH key on your local machine with:
ssh-keygen -t rsaThis will create a private key and public key, but first you will be asked a few questions:
Enter file in which to save the key (/Users/crypadvise/.ssh/id_rsa):Designate where you want to store the key. Pressing enter will use the default home directory shown.
Enter passphrase (empty for no passphrase):You can designate a passphrase when you set up SSH if you wish. This adds an extra layer of security at the cost of inconvenience for you, as you will need to use this password whenever you use your SSH key to login to a server.Once you create the private key and public key, the latter is stored at the file path you designated earlier. As an example, if we used the default file path, the public key will be stored at
Users/crypadvise/.ssh/id_rsa.pub.This is the public key that you add to your account to access your servers. If you'd prefer to use a third-party tool, you can make your SSH key with PuTTY and then use its client to connect to your server. The private key will be at
~/.ssh/id_rsa. It's important that you don't share this with anyone.How to use PuTTY in Windows to create an SSH Key for your CrypAdvise VPS
What is an SSH Key?
An SSH key is a credentialing system using the Secure Shell (SSH) Protocol. We use it very much like the way we use usernames and passwords.
While perhaps not as convenient (you need to have them stored on a specific device to work), they are much more difficult to hack than passwords, as they can be up to 4096 bits in length, making them immune from most brute force attacks. Also, unlike passwords, SSH keys are not sent to the server, which means that you are less vulnerable if the server itself gets hacked.
Getting PuTTY
The PuTTY SSH key utility is easy to use and free, which makes generating keys a simple process.
To get started, you will want to download this free utility from the PuTTY website. For Windows users, you will wish to download the MSI file that is appropriate for your system (32 or 64 bit).
Note: you can run either version on a 64 bit machine, so if you are unsure what system you are using, you can go ahead and use the 32 bit version; it should work fine.
Install the file by double clicking on the download and running the Windows installer.
After you have successfully installed PuTTY, to generate the key, find the PuTTYgen program from the Start menu. If you type “puttygen” after tapping the Windows key, you should find it.
When you first open the PuTTY SSH key utility, it will look something like this:
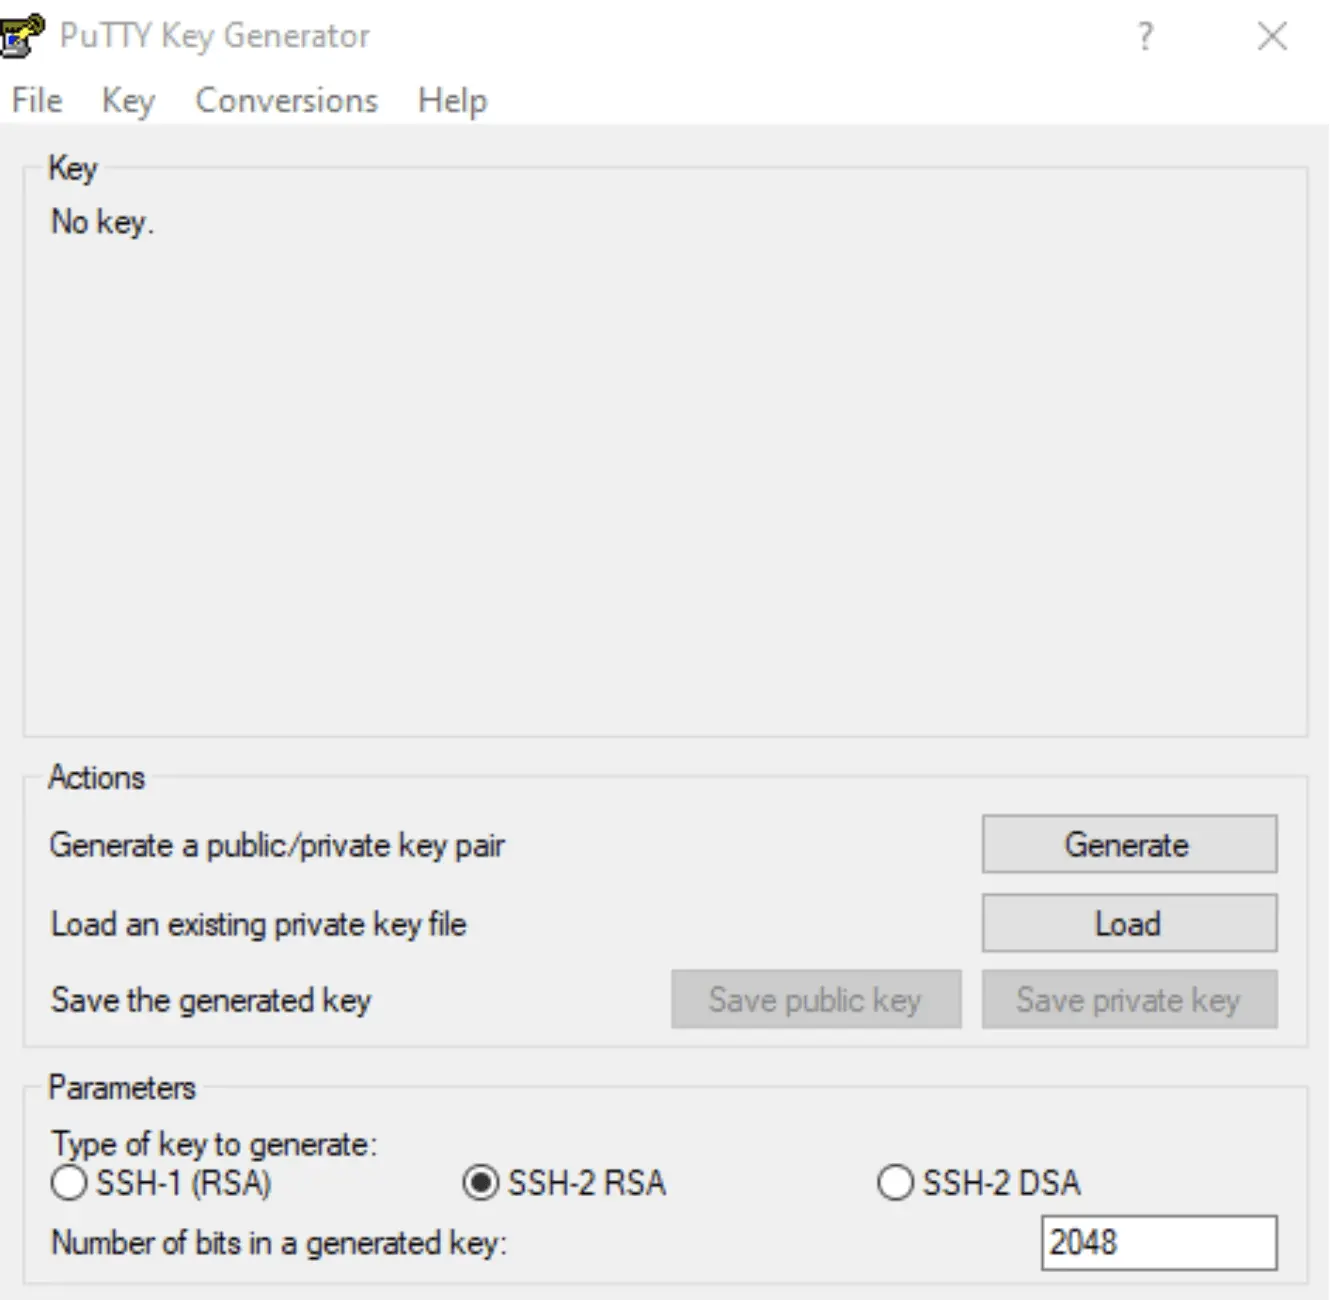
Parameters
The Parameters section at the bottom of the screen will allow you to choose which type of key to generate. Make sure you know which SSH key protocol is required; SSH-1 only supports RSA, whereas SSH-2 will support either RSA or DSA. If the systems you are using require DSA, you must choose this option. However, it is recommended that you choose RSA because it is far more secure. RSA is the recommended choice in most cases.
How to Generate an SSH Key with PuTTY
To use PuTTY to generate an SSH key create a key, click on “Generate” in the “Actions” section of the screen. You will receive a message instructing you to move your mouse around a bit on the screen to help create an action to help randomize the key that is being created, like so:
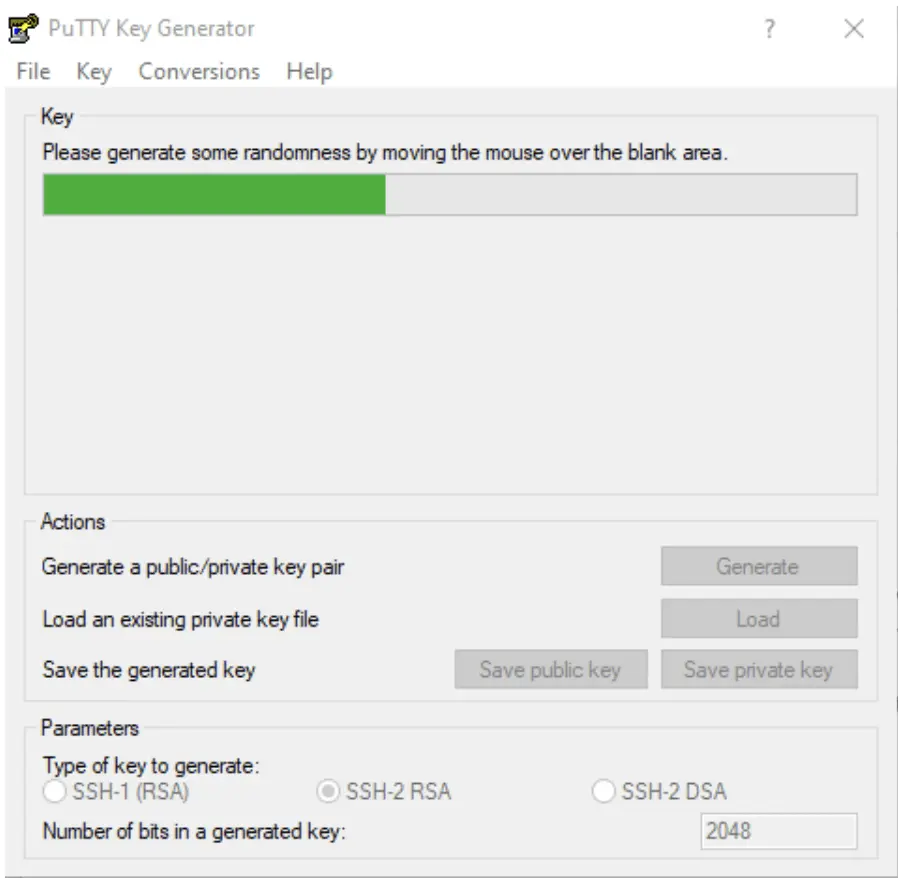
Do this until the key has been generated. When it is complete, you will be shown a screen that looks something like this:
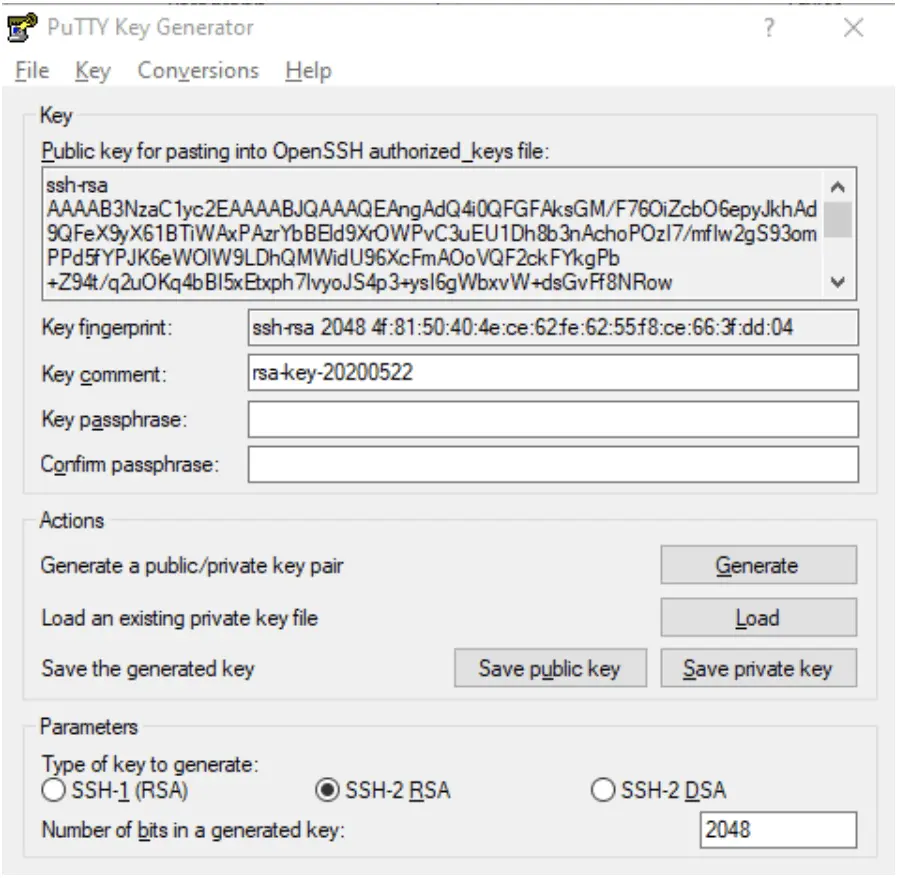
You can now see a copy of the public SSH key which can be copied for pasting into an OpenSSH authorized key file. You may wish to make a copy of this.
At this point, you will wish to create a passphrase to protect your key. While this is not required, it is recommended. Pick something that you will remember, but sufficiently long enough to prevent it from being detected by a computer using a brute force method of guessing your password. (Read this entertaining cartoon to learn how to come up with a good passphrase).
Next, click on “Save private key,” give it a name, and PuTTYgen will save it in a *.ppk format.
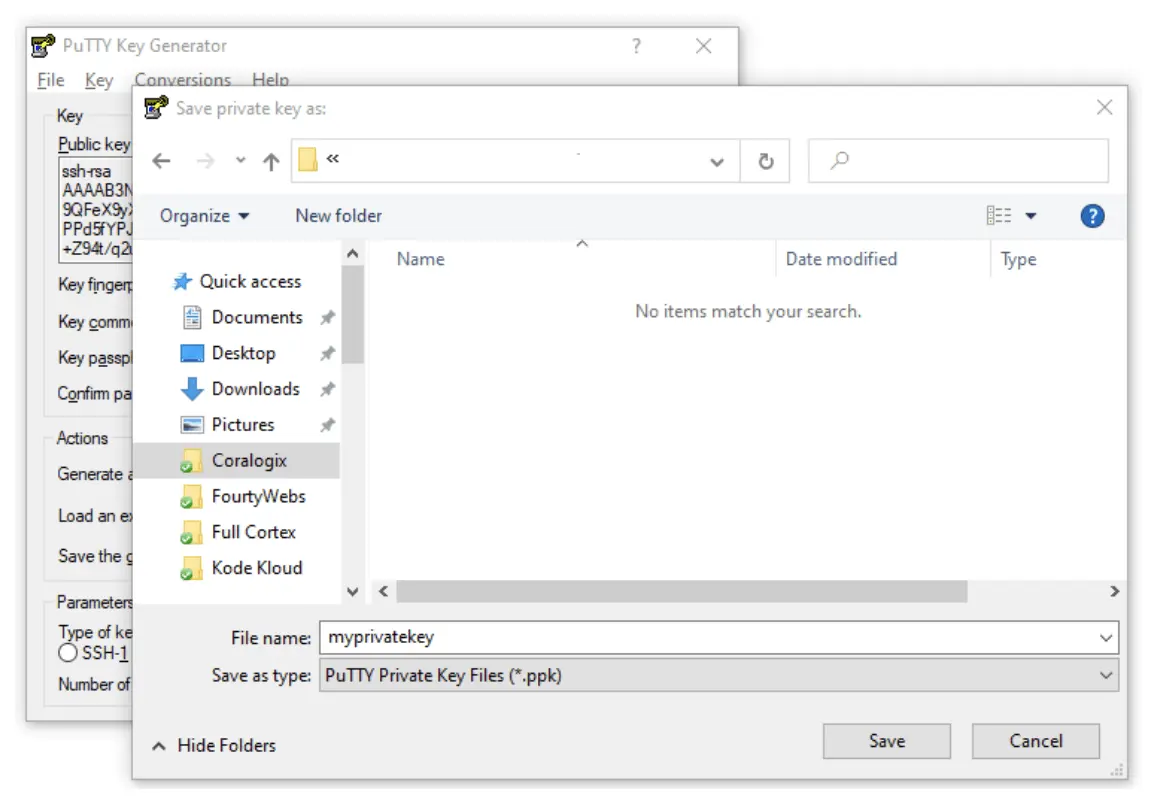
You now have a copy of your private SSH key which can be used for authentication on many SSH systems.
Public Key
You also have the option to save a copy of the public key, however it is important to be aware that PuTTY will save it in a format that is not compatible for OpenSSH on most Linux servers. As a result, the easiest way to get your public key again, is to click on “Load” (next to “Load an existing key file”) and browse to find an existing private key. You will then be prompted to enter the passphrase that you created, like so:
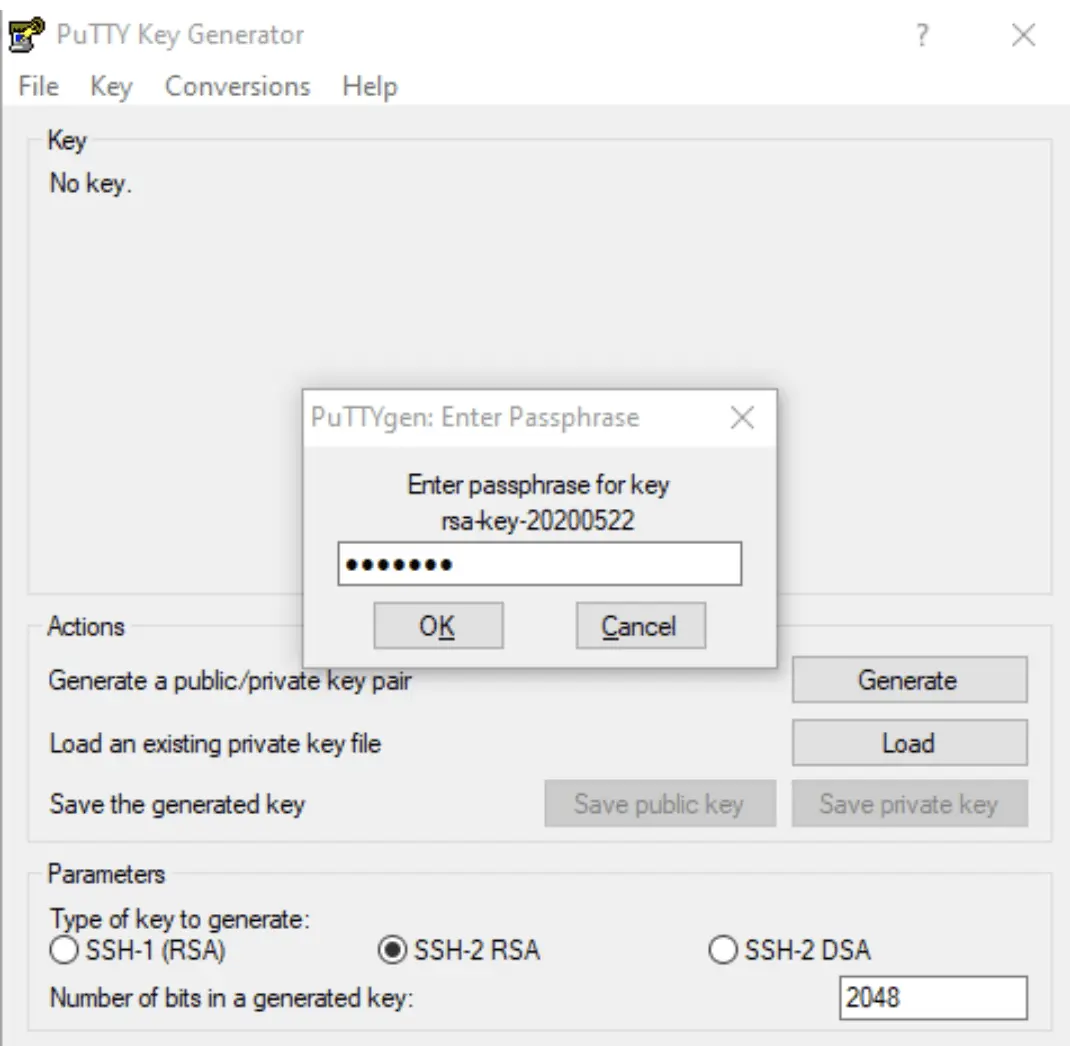
And it will bring up the public key again which you can copy and paste for your purposes.
Summary
You have now successfully created a private and public key pair which you can use for a wide range or purposes. For security reasons, it is recommended that you create a separate keypair for each application you intend to use. This is particularly true with DSA, which has some built-in security vulnerabilities.
Did this answer your question?
Why it happens and how to fix it
We've all been there. You try to connect to your VPS, only to run into the dreaded
permission denied (publickey)error. Unfortunately, the reason for this differs, which can make troubleshooting harder, but generally the issue falls into four categories:- You're trying to connect to the wrong server
- Your local machine doesn't have a matching key for your VPS server
- Your key isn't in the authorized_keys file on your VPS server
- Your local machine has too many keys
Let's run through the troubleshooting process to determine what's creating your
ssh permission deniederror and solve the root cause:Run ssh -vvv [email protected] for more info
You can save a lot of time by determining why you can't connect before you proceed. The following command will show you exactly what SSH is doing when you initiate a connection with your VPS server:
ssh -vvv [email protected]Naturally, you should replace
your.vps.ipwith the relevant IP address, which can be found in your control panel. Note down any output.Make sure you're connecting to the right server
It sounds basic, but it's all too easy to do. You may have typed in a single digit of your server's IP address wrong, or tried to connect to an old, expired server rather than your new one.
Double-check your credentials in your server control panel and be sure to copy and paste the information rather than typing it to ensure accuracy. You'd be surprised how easy it is to get two numbers mixed up.
Additionally, if you've just created the server, wait a few minutes a try again. Sometimes the server may indicate that it's live even if it's not quite ready for connection.
Try logging in with a password instead
For the short term, you may be able to log in with a password instead. This won't work if you're using PuTTY, or if you have password authentication disabled. You can give it a try with the following command:
ssh -o PreferredAuthentications=password -o PubkeyAuthentication=no [email protected]If you don't have password authentication enabled, you can change that by clicking on the server in yourCrypAdvise control panel, selecting “Access”, and entering a password. This will reboot your server and reset your password.
On your local machine, run
ssh-keygen -R your.server.ipto get rid of your old key. Now, you should be able to connect to your server both if your local machine or VPS server didn't have a matching key.Manually add your SSH key to the VPS server
Now that you're able to log in to your VPS server with a password, you can add an SSH key again.
Generate a key with:
ssh-keygen -t rsaThen, if needed, copy it to your vps manually by typing
ssh-copy-id [email protected].Alternatively, copy it via SSH with:
cat ~/.ssh/id_rsa.pub | ssh [email protected] "mkdir -p ~/.ssh && cat >> ~/.ssh/authorized_keys"You may want to make SSH keys your sole authentication method by editing the ssh_config file:sudo nano /etc/ssh/sshd_configChange
PasswordAuthentication yestoPasswordAuthentication no, and save the changes.Manually choose which key to use
If you have too many keys on your local machine, your
ssh -vvvoutput will have the outputtoo many authentication failures for root. You can bypass this by explicitly mentioning the correct key, like so:ssh -i /home/crypadvise/.shh/id_rsa [email protected]If you're still struggling with these steps and you're a CrypAdvise customer, reach out to our expert support, who will be happy to aid you further.
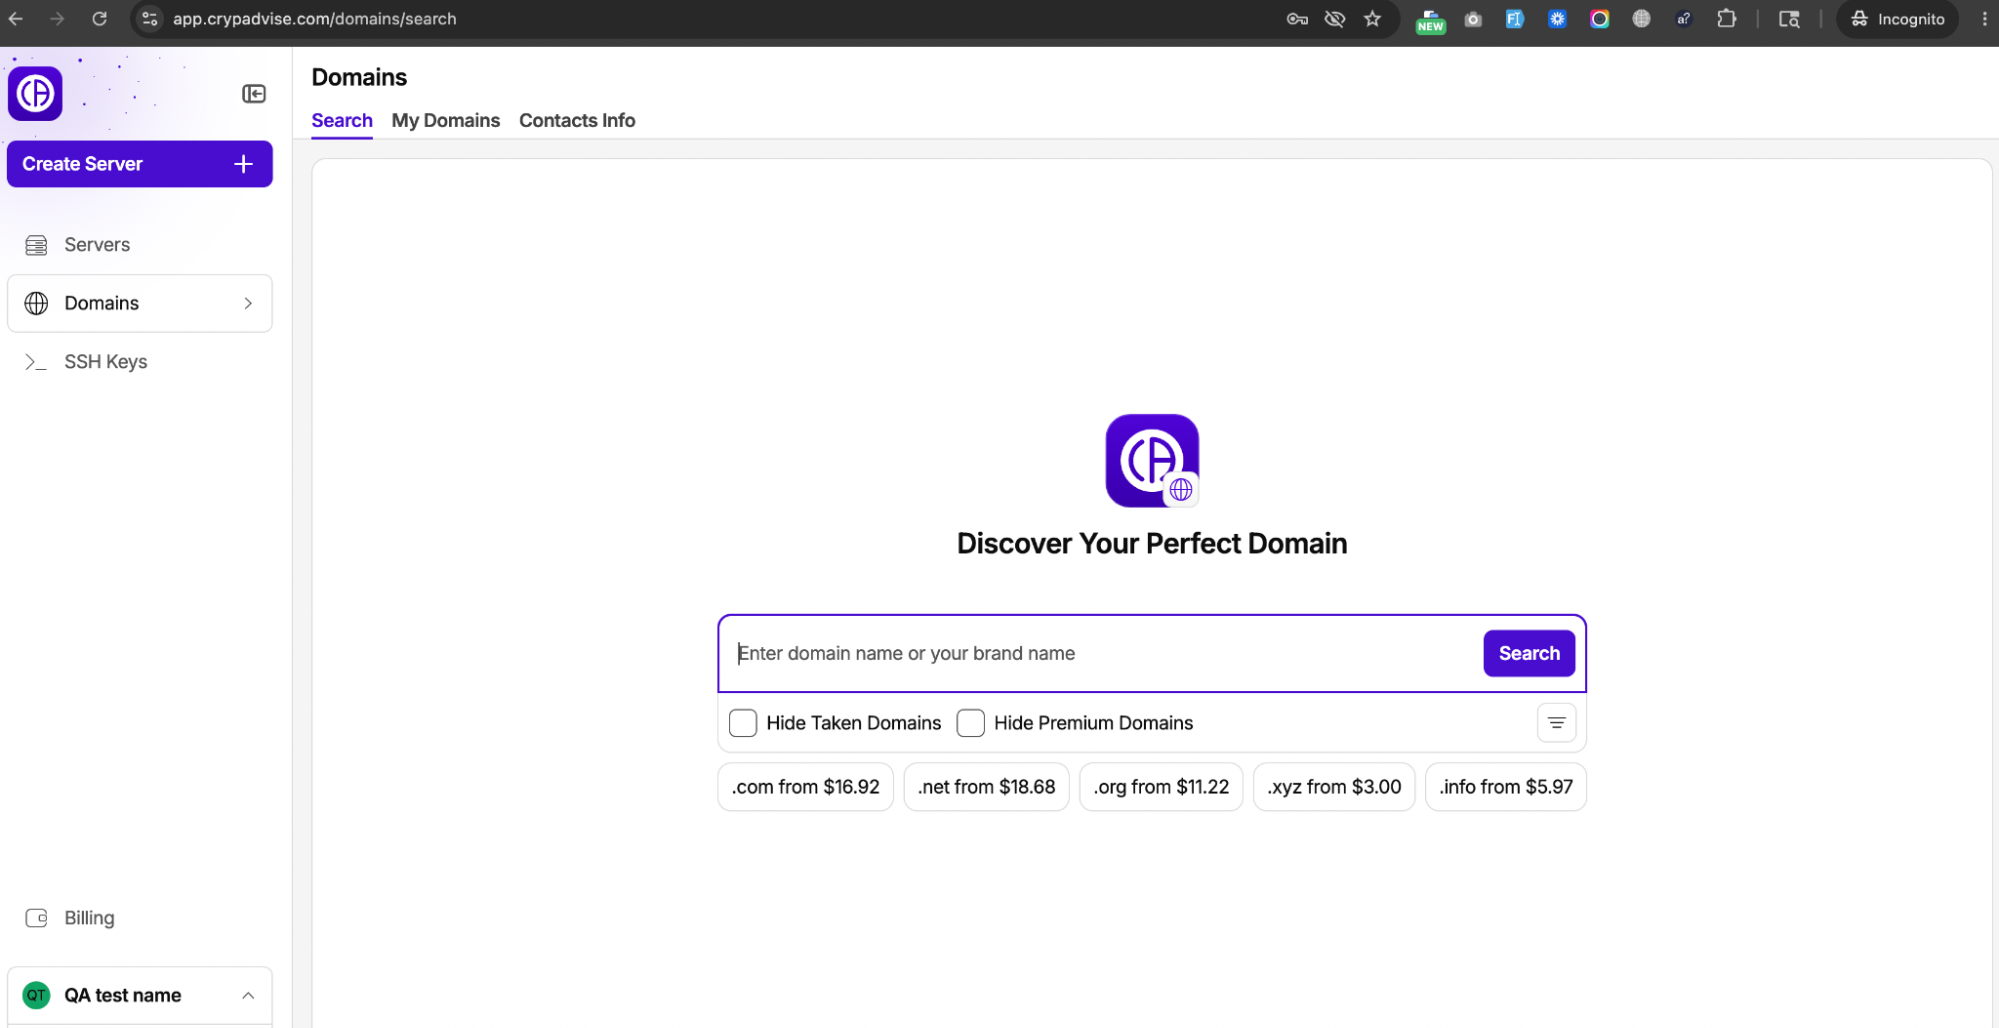
Domains
The Domains section is accessible from the main navigation menu. It has three tabs:
- Search — find and register new domains
- My Domains — manage your registered domains
- Contacts Info — manage contact records (WHOIS data)
When you open a specific domain from My Domains, you see a detail page with five tabs:
Tab
What you can do there
Overview
Registration/expiration dates, WHOIS Protect toggle, renewal options
NS Records
Edit nameservers — switch between the provider's NS or custom NS
DNS Records
Add/edit A, AAAA, CNAME, MX, TXT, SRV, CAA records
Contact info
View and edit the WHOIS contact assigned to this domain
Billing
Renewal cost, next payment date, transaction history, auto-renew toggle
⚠️ DNS record changes can take up to 48 hours to propagate across the global DNS network.
Searching for a Domain
- Go to Domains → Search tab.
- Enter a domain name or brand name in the search field.
- Click Search.
- Results show available and taken domains with prices.
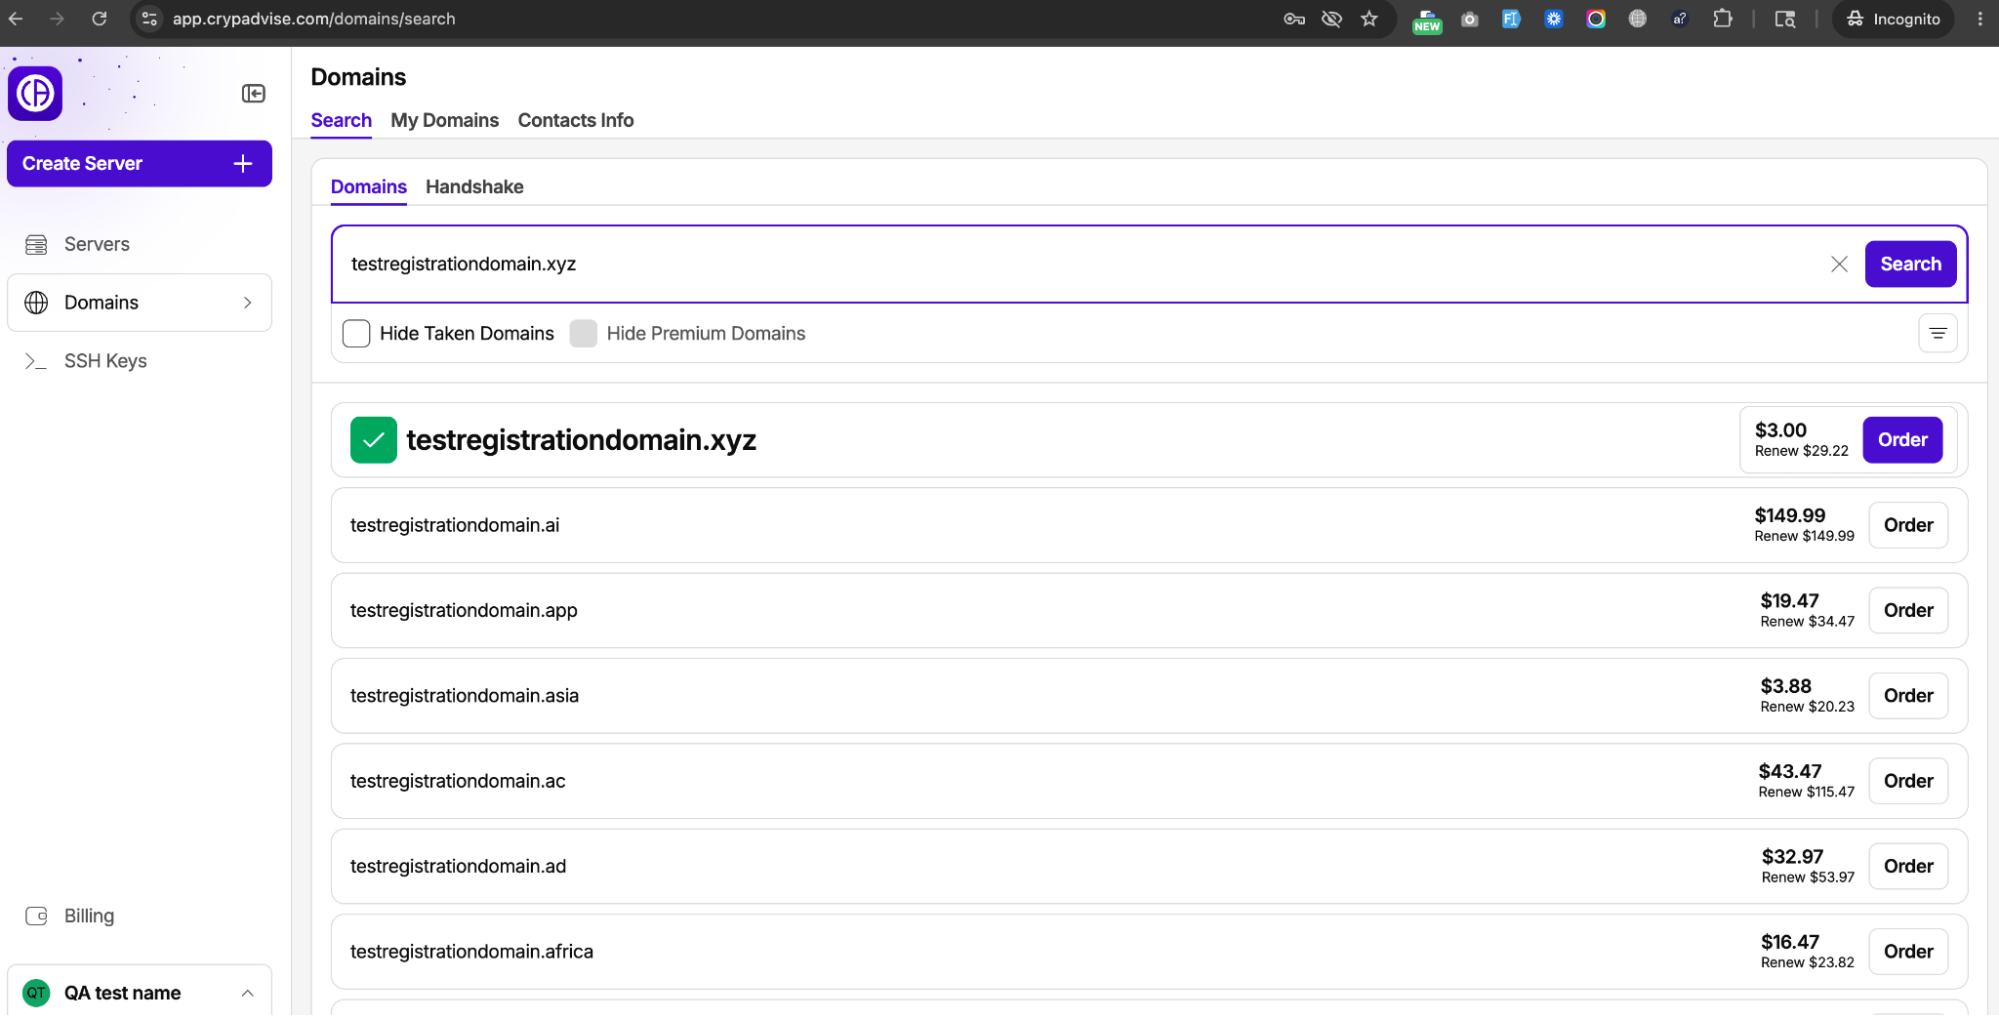
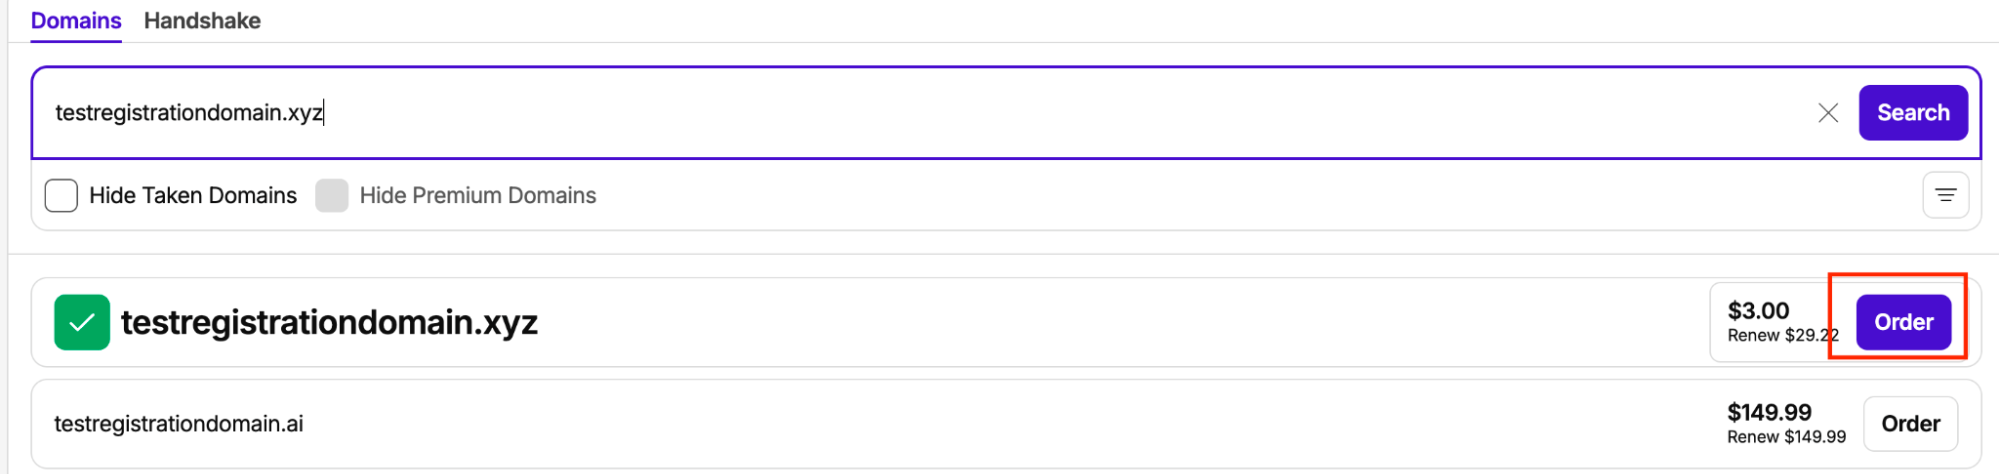
Each result row shows:
- Domain name (e.g. example.xyz)
- Registration price (e.g. $3.00)
- Renewal price (e.g. Renew $29.22)
- Order button — click to start registration
✅ The first result with a green checkmark icon is the exact domain you typed — it is available for immediate registration. Domains without an Order button are already taken.
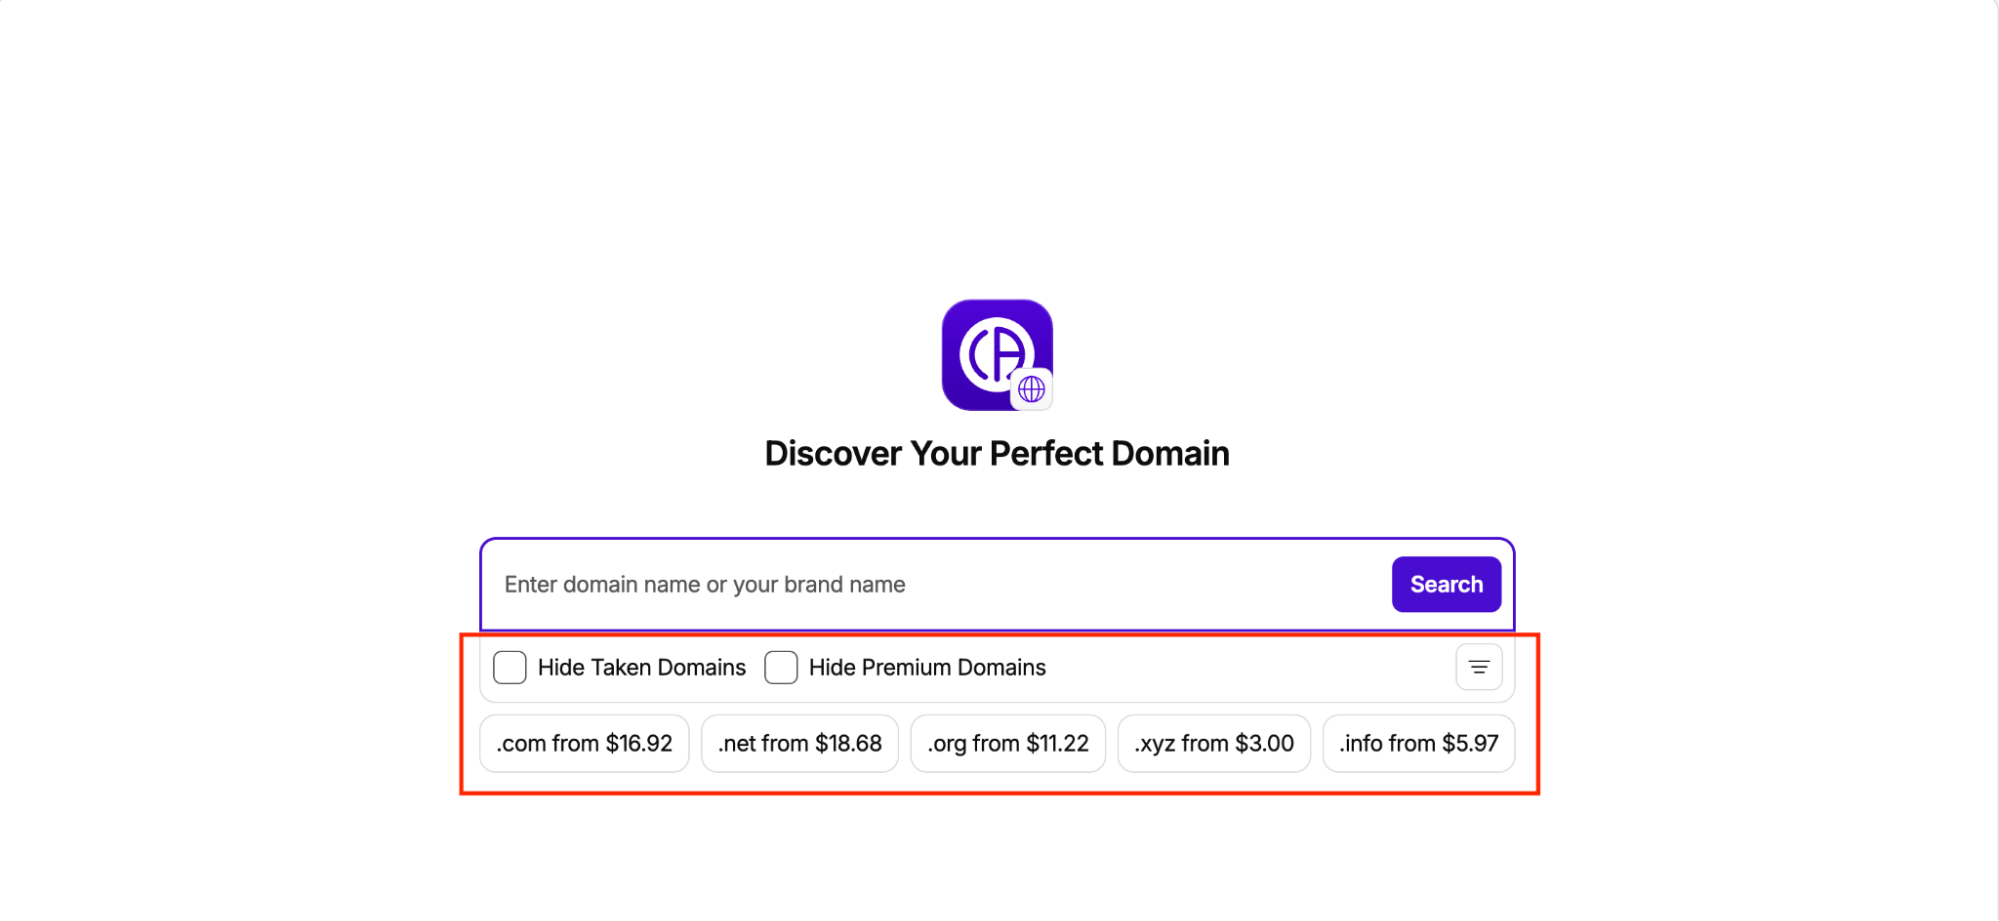
Filter Options
Below the search field there are two checkboxes and a filter icon:
Filter
Effect
Hide Taken Domains
Hides already registered domains — shows only available ones
Hide Premium Domains
Hides premium-priced domains (toggle is grayed out when inactive)

Opens the TLD Filter modal — lets you select specific domain extensions
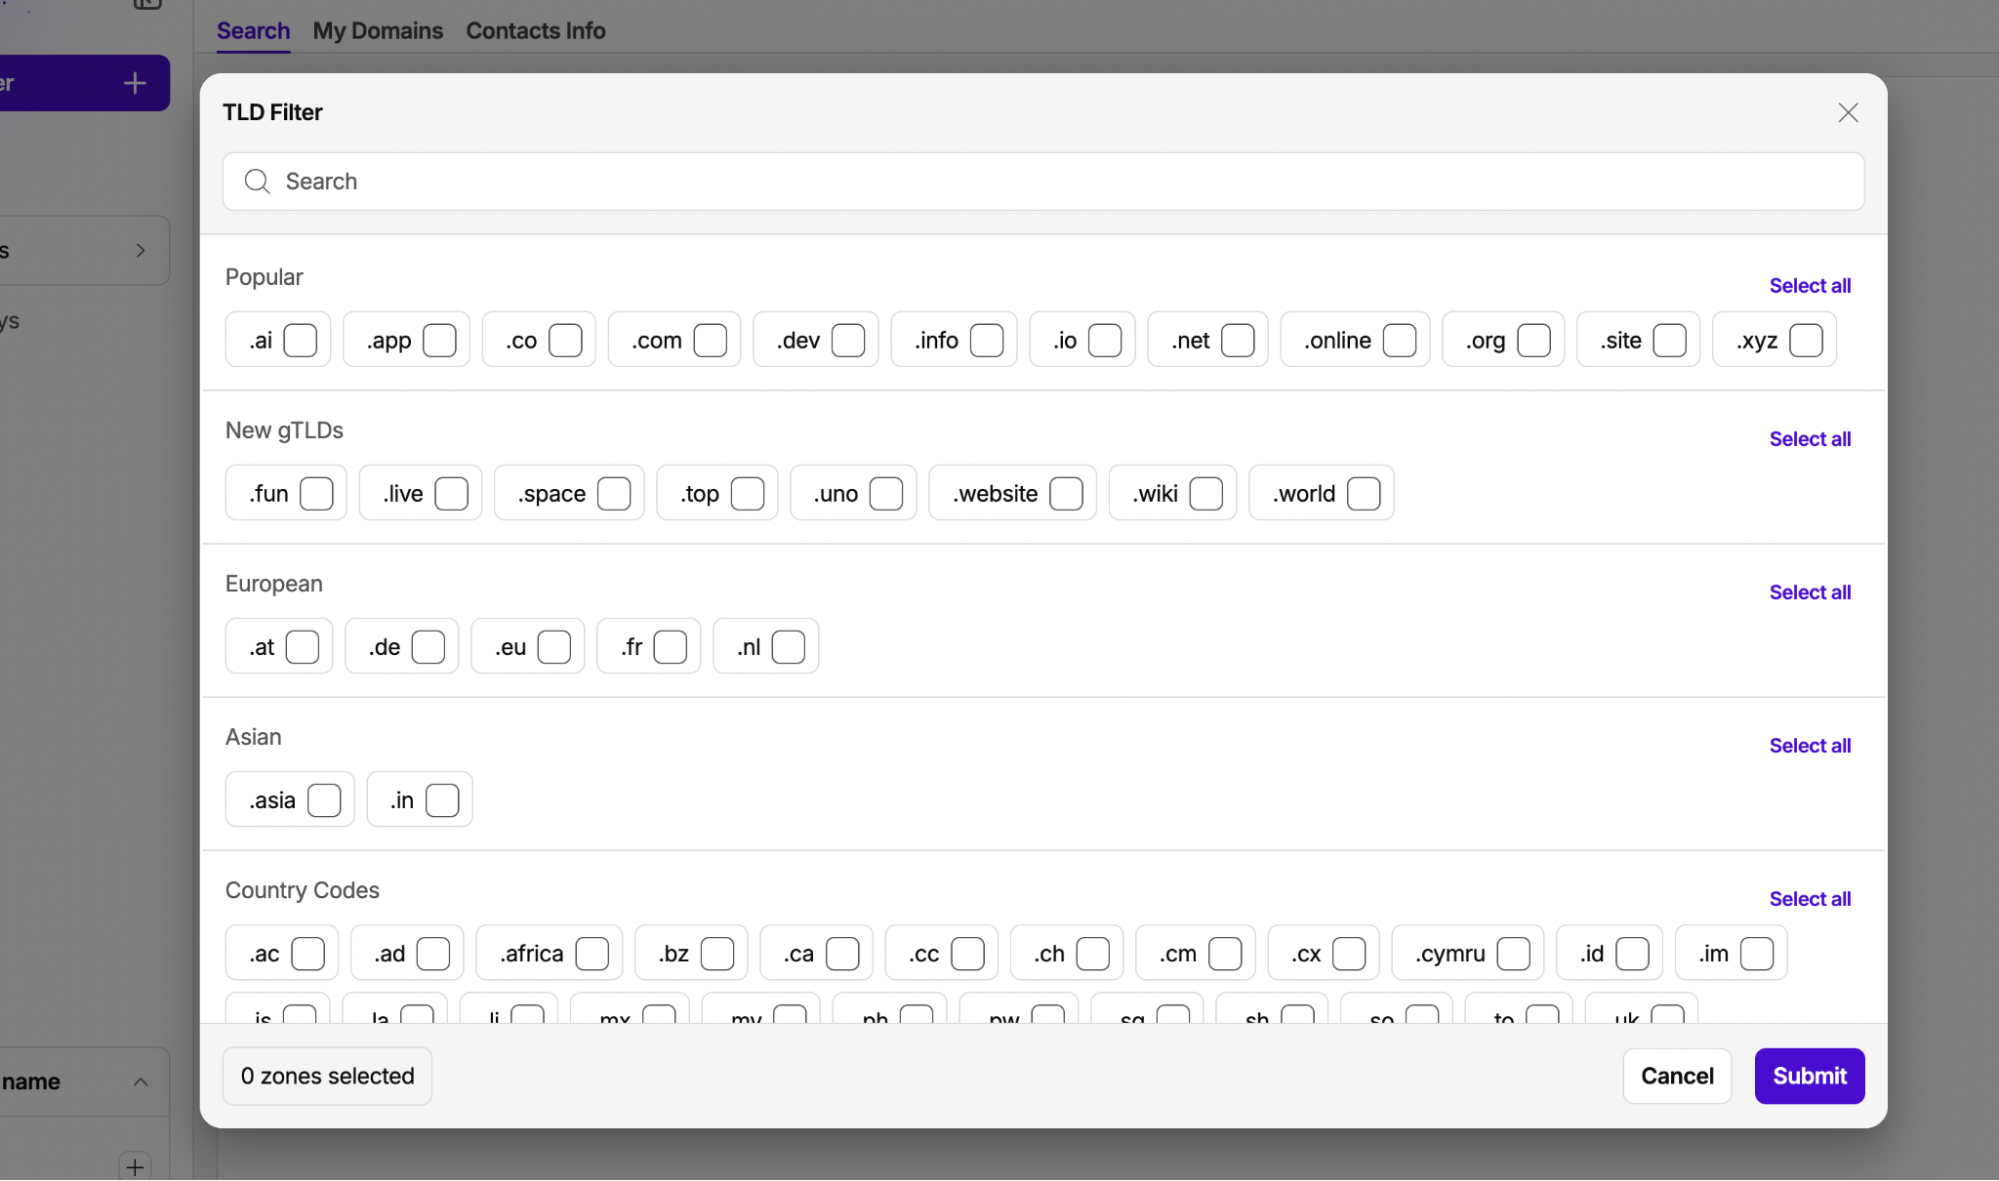
TLD Filter modal — click
to open it. Extensions are grouped by category:- Popular — .com, .net, .org, .io, .ai, .dev, .co, .app, .site, .xyz, .online, .info
- New gTLDs — .fun, .live, .space, .top, .uno, .website, .wiki, .world
- European — .at, .de, .eu, .fr, .nl
- Asian — .asia, .in
- Country Codes — .ac, .ad, .africa, .bz, .ca, .cc, .ch, and many more
Use the Search field inside the modal to quickly find a specific extension. Select all toggles the entire group. The bottom bar shows how many zones are selected. Click Submit to apply, Cancel to dismiss.
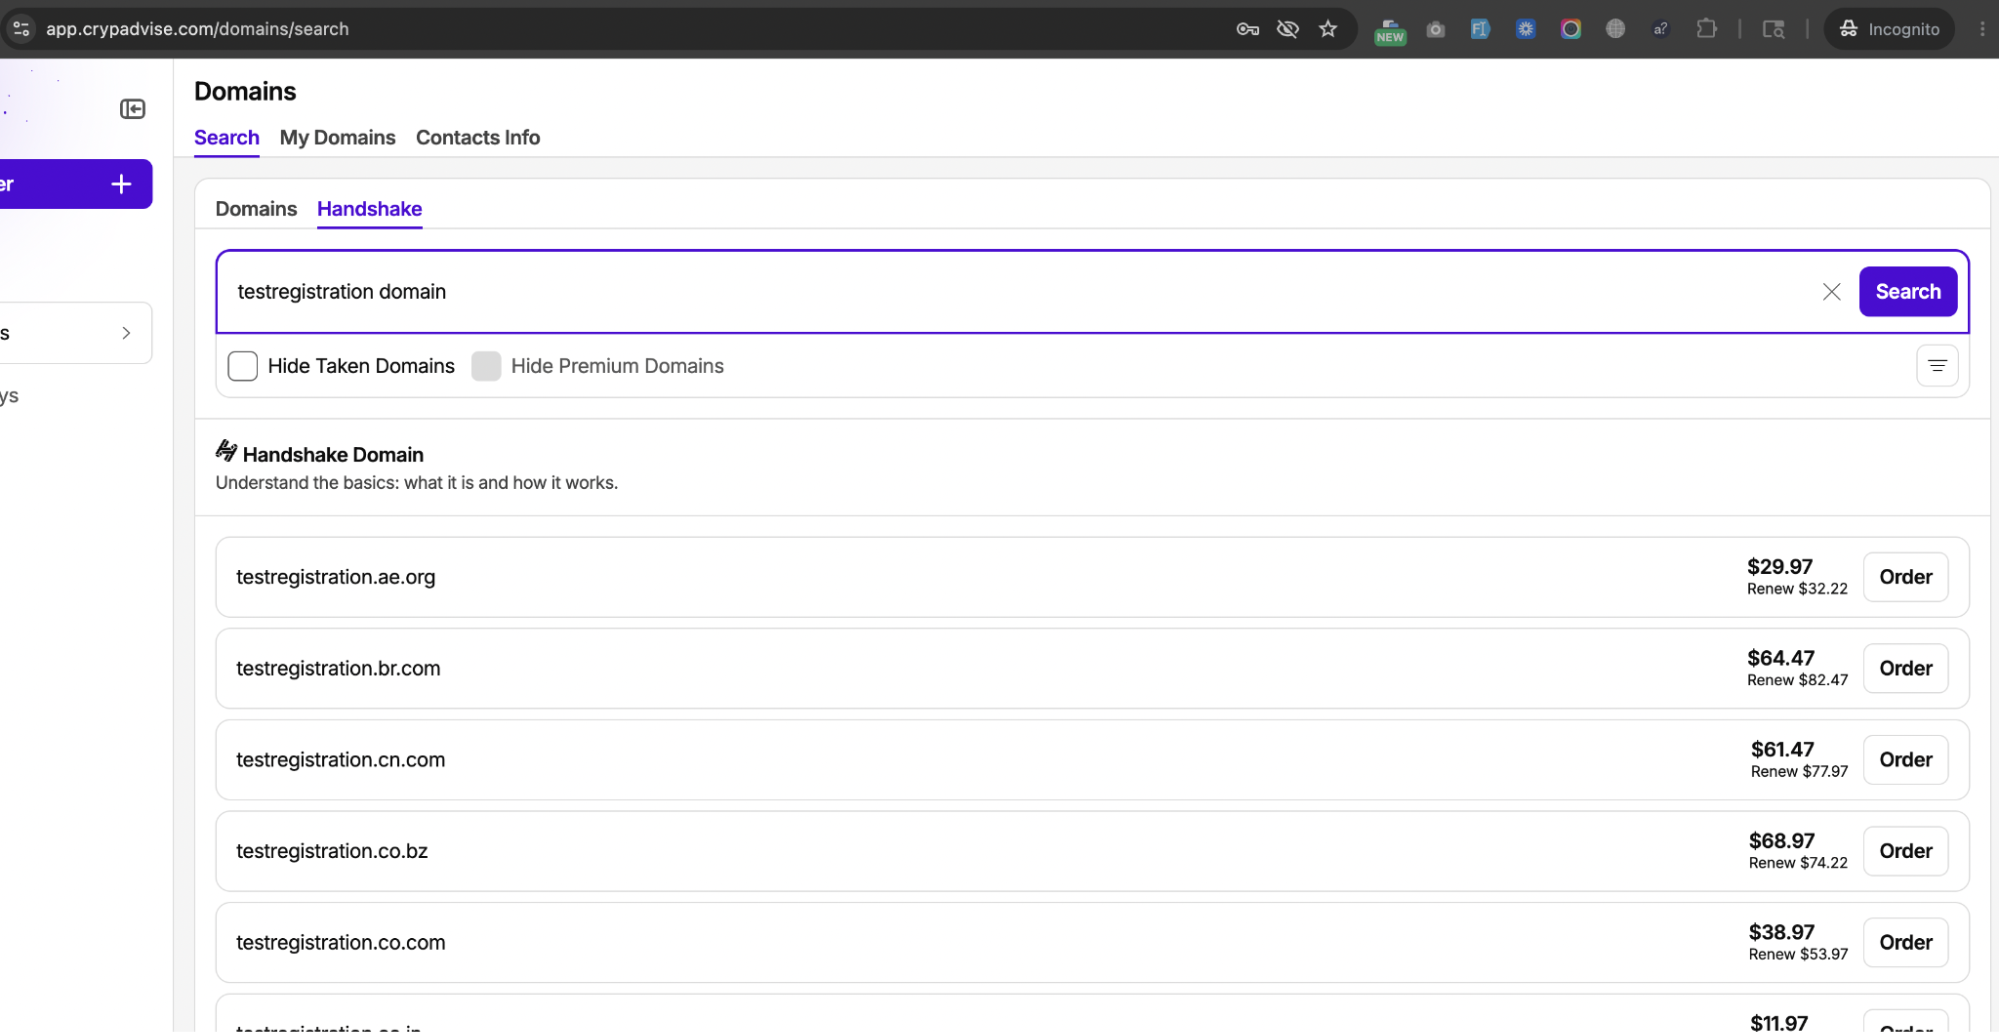
Handshake Domains
The search results page has two tabs: Domains and Handshake. The Handshake tab shows decentralized domains registered on the Handshake blockchain. These work differently from standard ICANN domains and may require a compatible browser or resolver.
Starting the Order
Find an available domain in the search results → click Order next to it.
Order Flow — Information Step
The order page has three steps: Information → Payment → Confirmation.
On the Information step, configure:
Field
Description
Domain name
The domain you are registering (read-only)
Duration
Registration period: 1 year (default), or longer depending on TLD
Whois protection
Free WHOIS privacy — hides your personal data from public WHOIS lookups
Auto-renew
Automatically renew the domain before expiration
Price
Shown for the selected duration
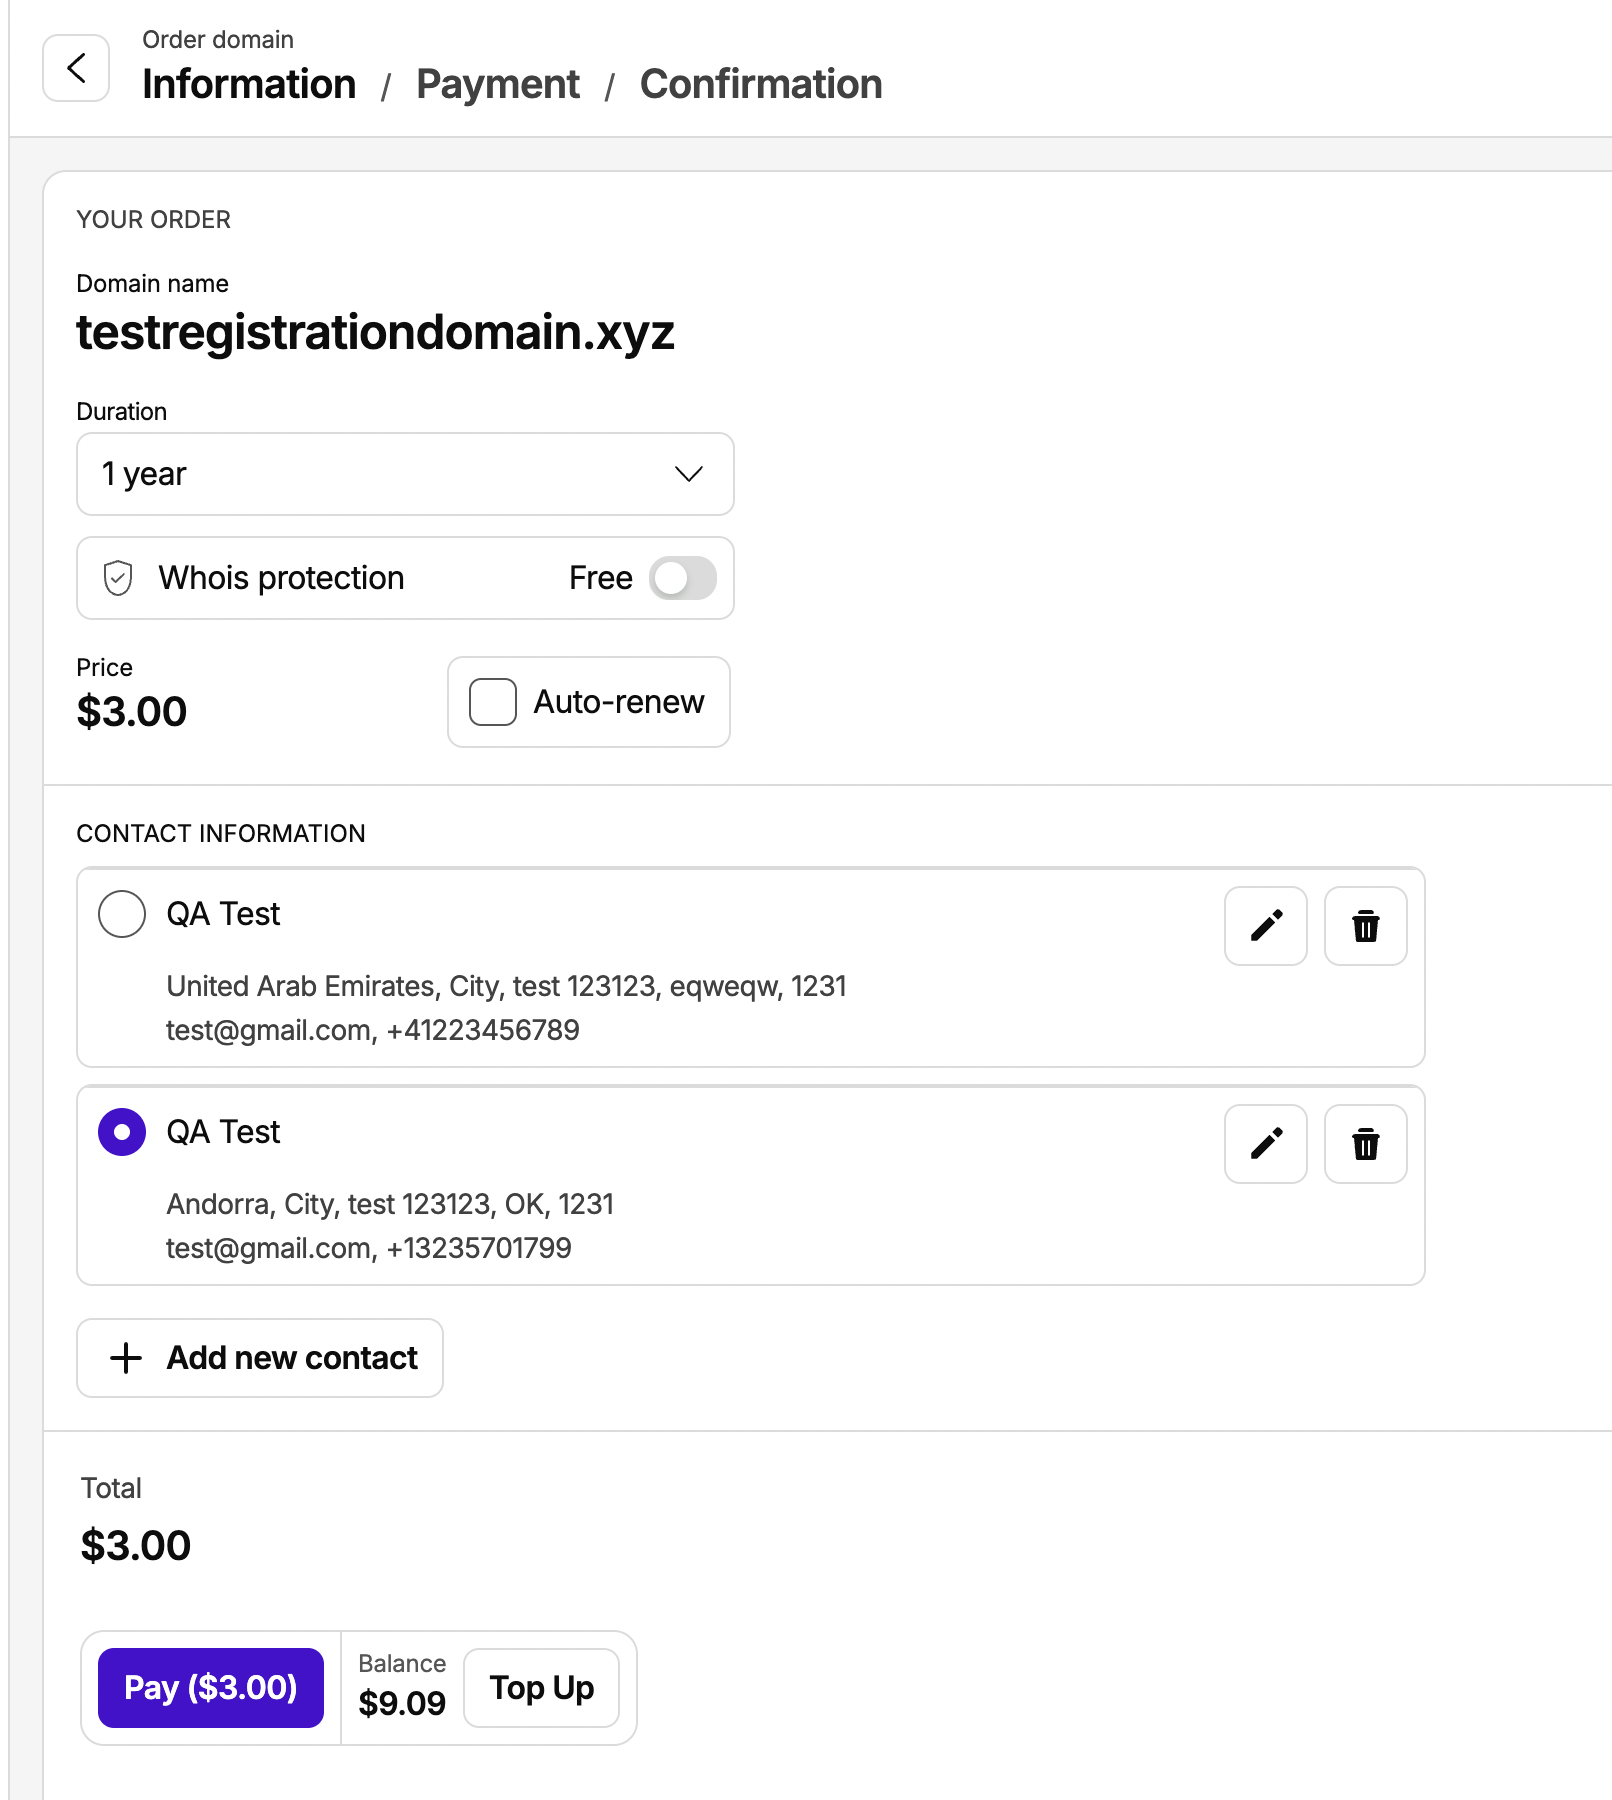
Contact Information
You must assign a contact to the domain before placing the order. The contact stores your WHOIS registration data (name, address, email, phone).
- Select an existing contact — click the radio button next to it
- Edit a contact — pencil icon
- Delete a contact — trash icon
- Add a new contact — + Add new contact button
⚠️ If a contact is flagged as Invalid contact (highlighted in red), you must edit it and fix all required fields before placing the order. An invalid contact cannot be selected.
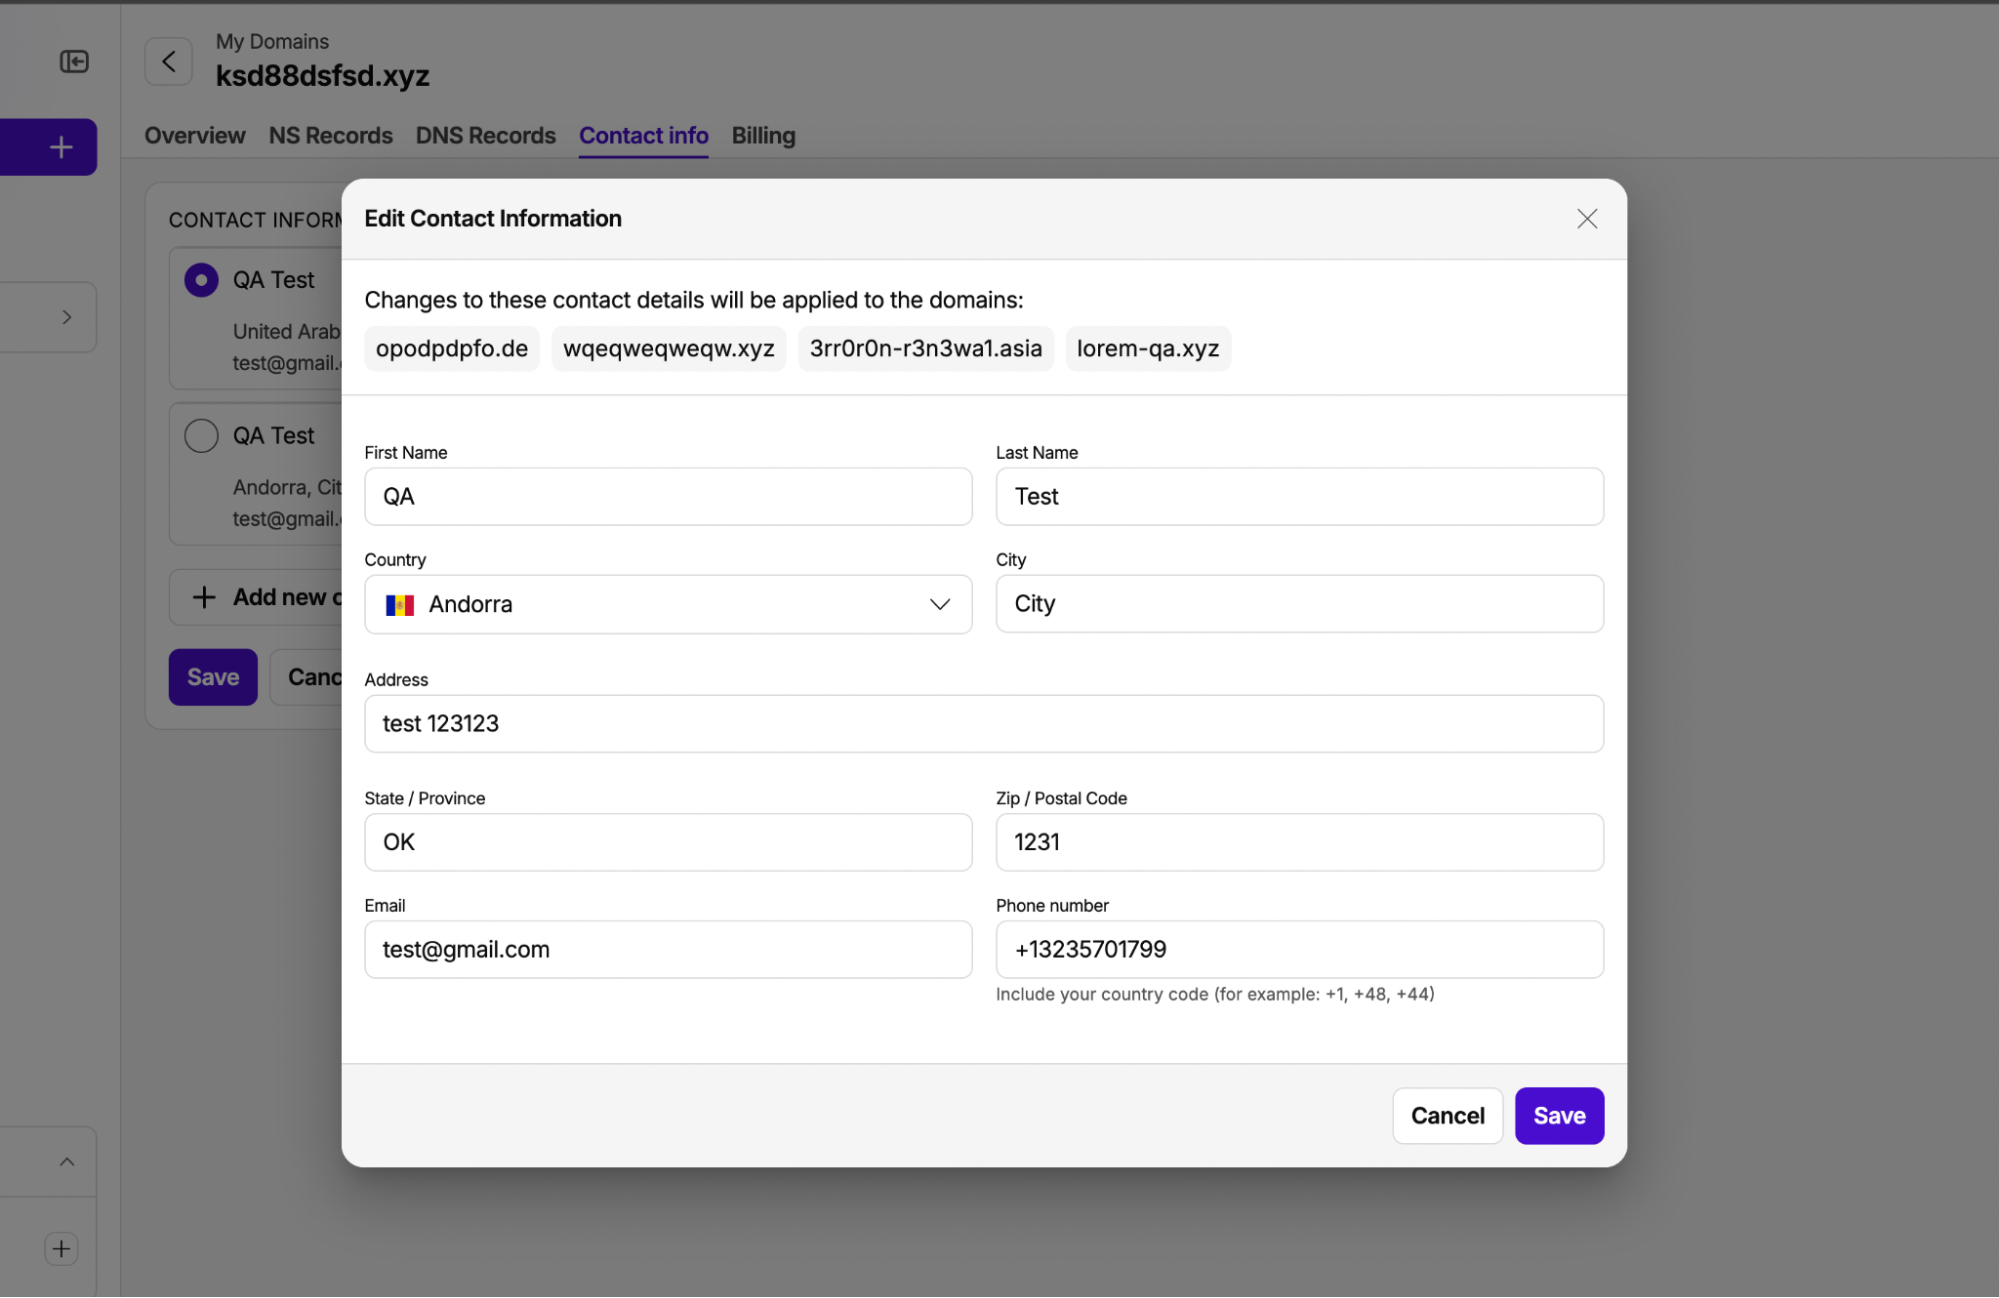
Editing a contact — the Edit Contact Information modal opens. Fill in all fields:
- First Name / Last Name
- Country (select from dropdown)
- City
- Address
- State / Province
- Zip / Postal Code
- Phone number — must include country code (e.g. +1, +48, +44)
*All fields are required.
ℹ️ Changes to a contact will be applied to all other domains that use it. The list of affected domains is shown at the top of the modal.
Payment
The Total section at the bottom shows the final amount. Click Pay ($X.XX) to proceed. Your current account Balance is displayed. If the balance is insufficient, click Top Up to add funds.
Domain List
The My Domains tab shows all domains in your account as a sortable table:
Column
Description
Domain name
Clickable — opens the domain detail page.
A warning icon indicates that there are issues with the domain. To see detailed information about the error, hover over the icon — the tooltip will display the context of the problemRegistration Date
Date the domain was registered (DD.MM.YYYY)
Expiration Date
Date the domain expires. An Expired badge appears if past due
Auto-Renew
Toggle — Enabled (purple) or Disabled (gray)
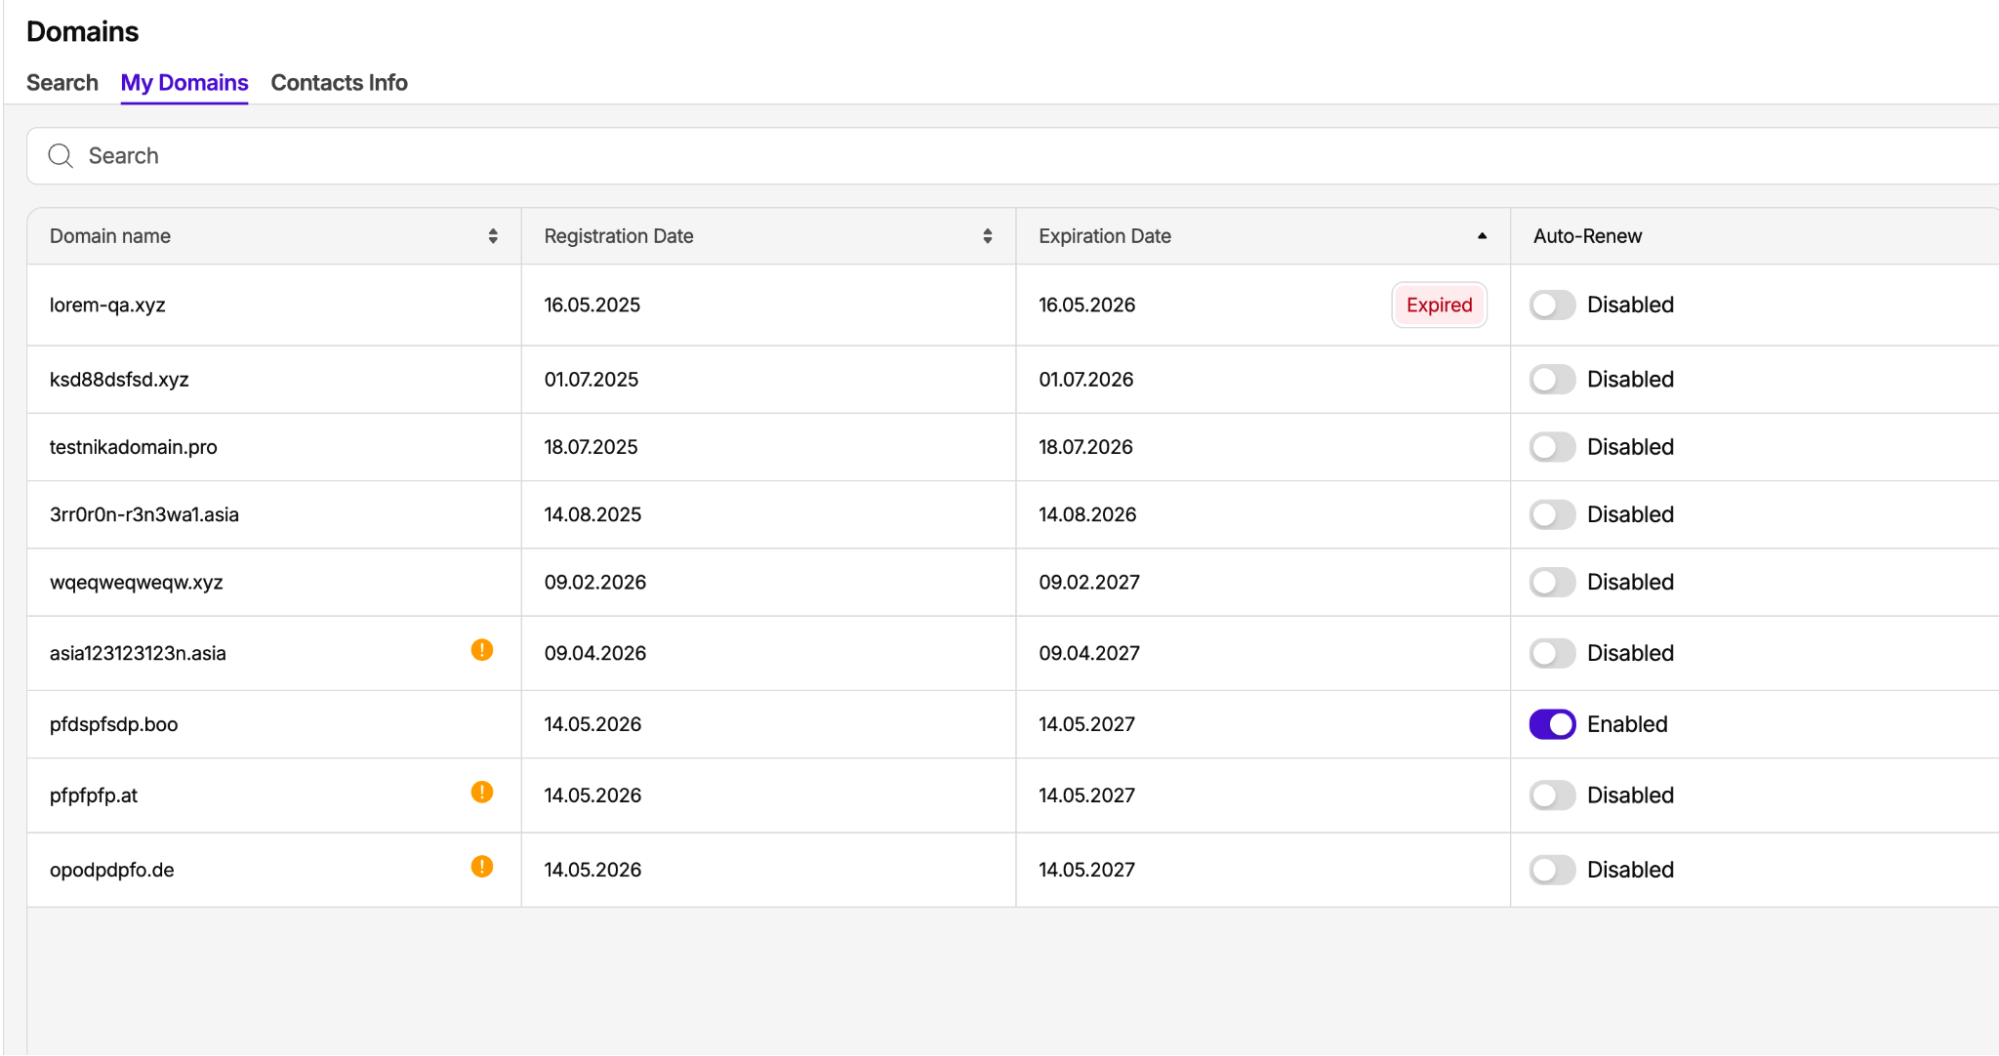
Click any domain name to open its detail page. Use the Search field at the top to filter by domain name.
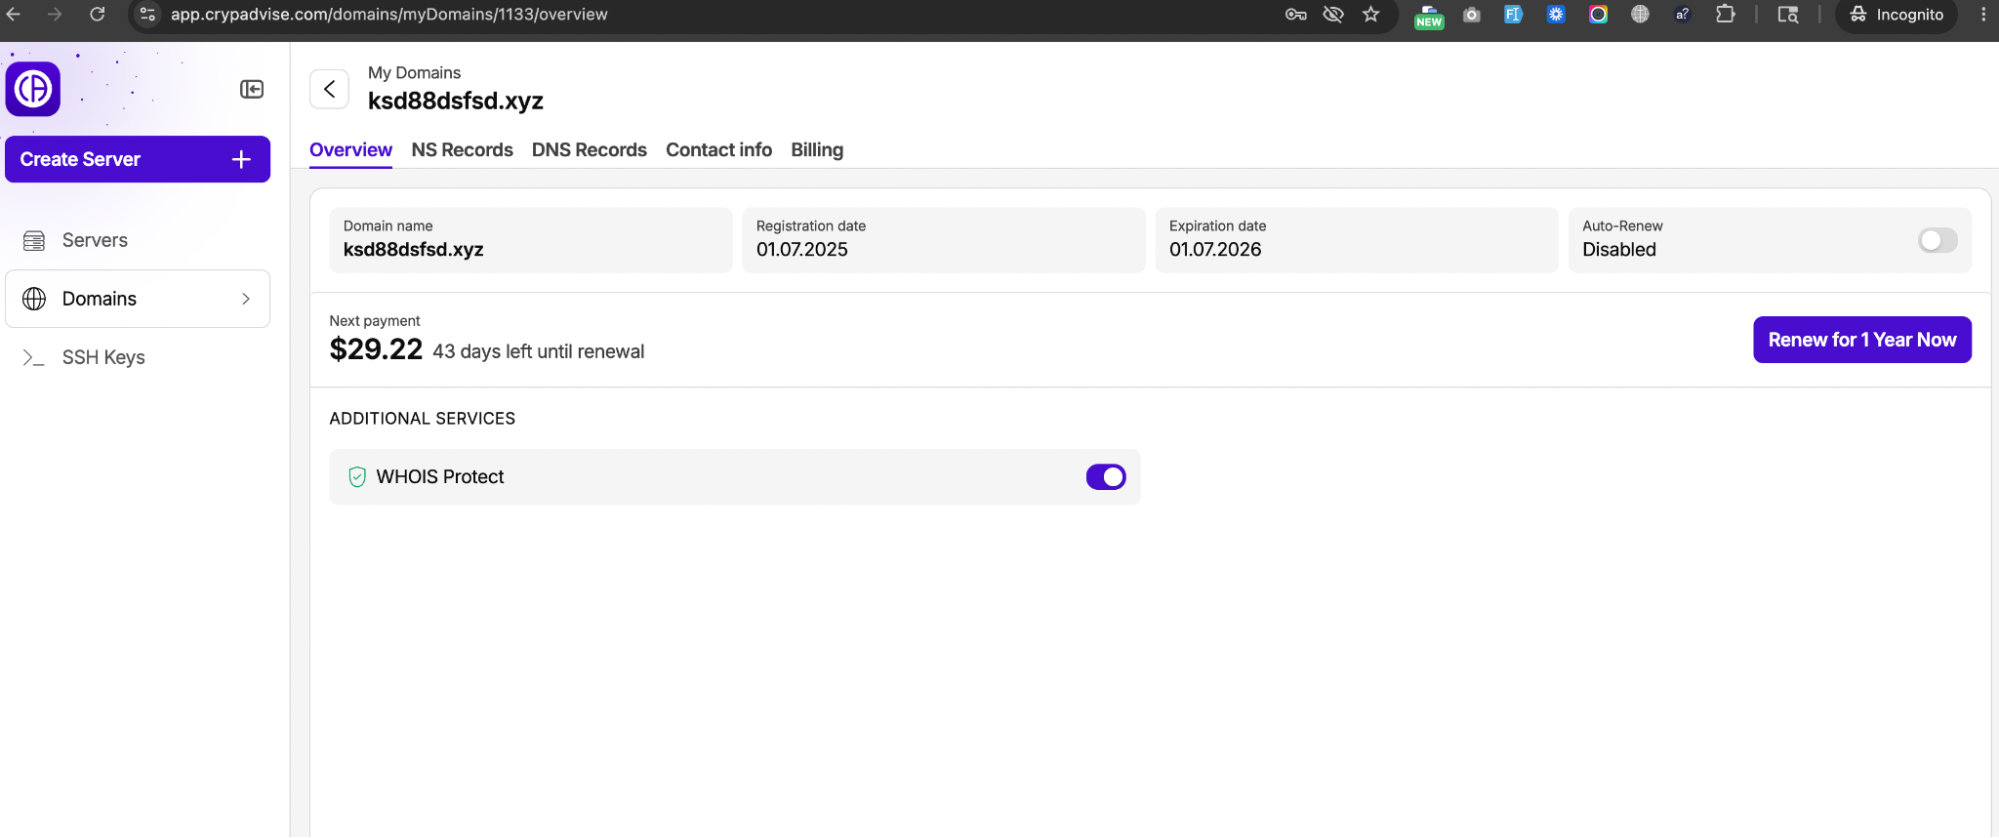
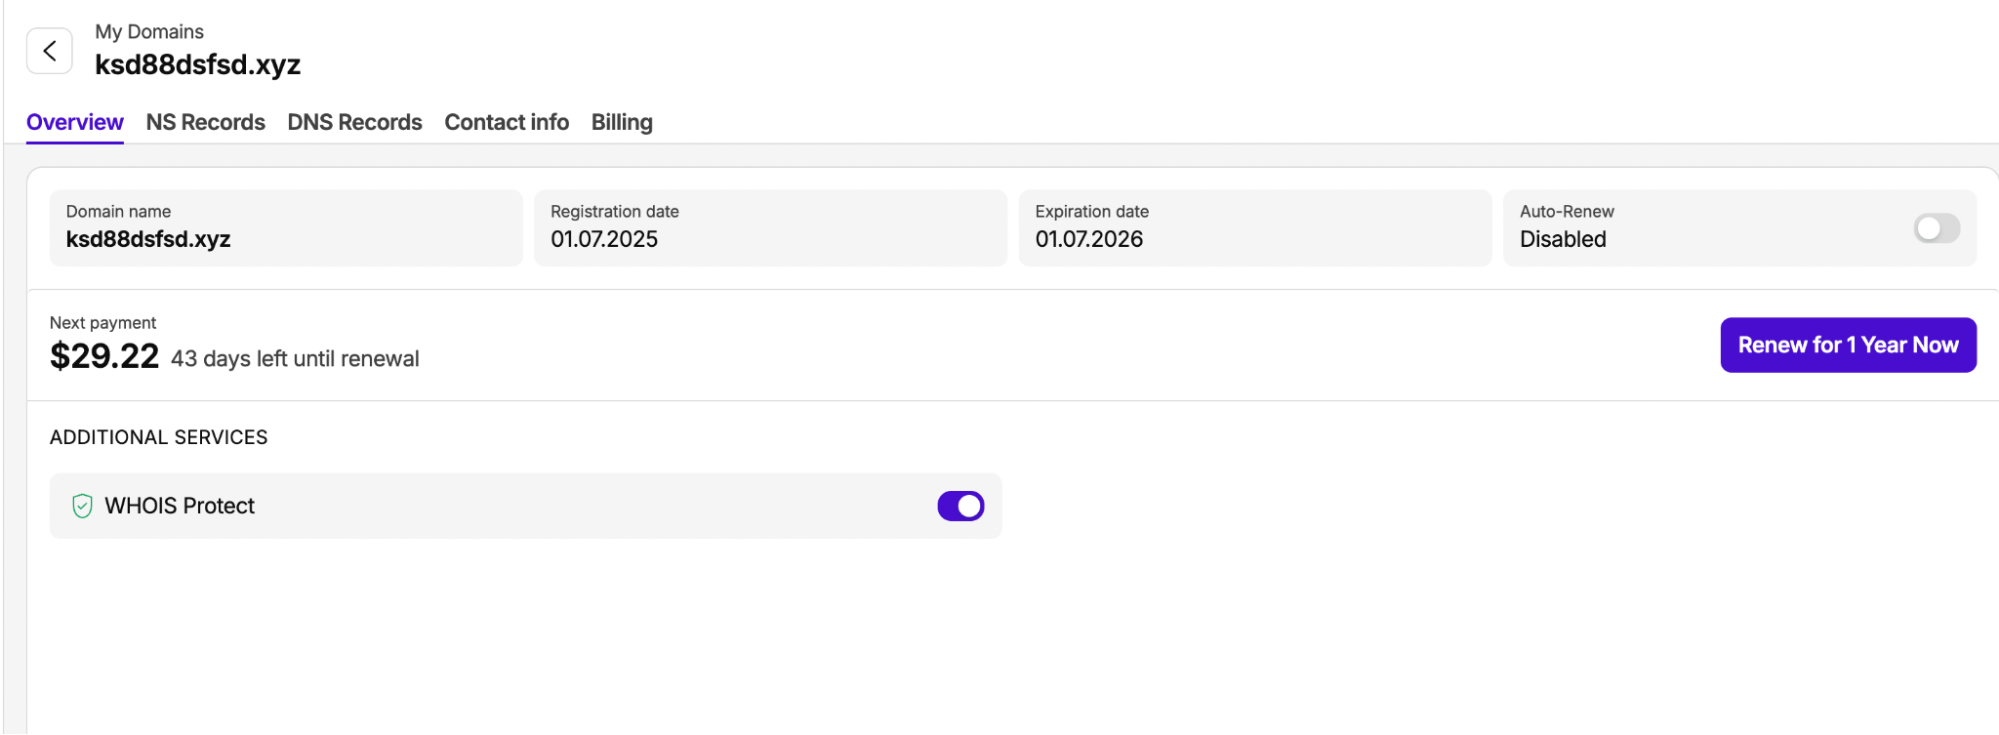
Overview Tab
Shows:
- Domain name, registration date, and expiration date
- Auto-Renew toggle
- Next payment amount and days left until renewal
- Renew for 1 Year Now button
- Additional Services — WHOIS Protect toggle
✅ Enable WHOIS Protect to hide your personal information (name, address, email, phone) from public WHOIS lookups. This service is free of charge.
What Are Nameservers?
Nameservers (NS) are the servers responsible for translating your domain name into an IP address. Every domain must have at least two nameservers assigned to it.
By default, newly registered domains use the nameservers assigned by your domain registrar. These default nameservers are set automatically and may vary depending on where the domain was purchased.
While these default NS are active, you can manage DNS records directly in the DNS Records tab. If you point the domain to a third-party hosting provider's nameservers, DNS management moves to that provider's control panel.
Viewing Nameservers
- Go to My Domains → click on a domain name.
- Open the NS Records tab.
- Current nameservers are listed in the Name Server table.

Editing a Nameserver
- On the NS Records tab, click Edit next to the nameserver you want to change.
- Enter the new address in the format ns1.example.com.
- Save your changes.
⚠️ Enter nameservers in hostname-only format (ns1.example.tld) — no IP addresses. If your hosting provider gave you both a hostname and an IP, enter only the hostname.
ℹ️ Changes may take up to 48 hours to propagate.
Adding a New NS Record
- On the NS Records tab, click + Add New NS Record.
- Enter the nameserver hostname.
- Save your changes.
TLD-specific requirements:
TLD
Nameserver requirements
.de
At least 2; all must resolve to different IPs
.fr
At least 2; SOA record must exist on the target NS
.is
At least 2 different NS; hosts must not share an IP
.ca
Between 2 and 6; each must have a unique IP
.mx
Maximum 5 nameservers
.to
Maximum 4 nameservers
Others
At least 2 recommended (industry standard)
Switching to Provider's NS (Default Nameservers)
Check the "Use provider's NS" checkbox to switch the domain back to the platform's default nameservers. This makes the DNS Records tab active again.
⚠️ Switching nameservers will overwrite all existing DNS records. Before switching, save your current A, MX, CNAME, and TXT records — take a screenshot or copy them manually.
ℹ️ Changes may take up to 48 hours to propagate.
Overview
The DNS Records tab is only available when the domain uses the platform's default nameservers. If the domain points to third-party nameservers, manage DNS records in that provider's control panel.
Supported record types:
Record Type
Purpose
A
Maps a hostname to an IPv4 address
AAAA
Maps a hostname to an IPv6 address
CNAME
Aliases one hostname to another (e.g. www → parkingpage.namecheap.com)
MX
Specifies mail servers for the domain
TXT
Stores text data — domain verification, SPF, DKIM, DMARC
SRV
Defines services available on the domain (protocol, port, weight, priority)
CAA
Authorizes specific Certificate Authorities to issue SSL/TLS certificates
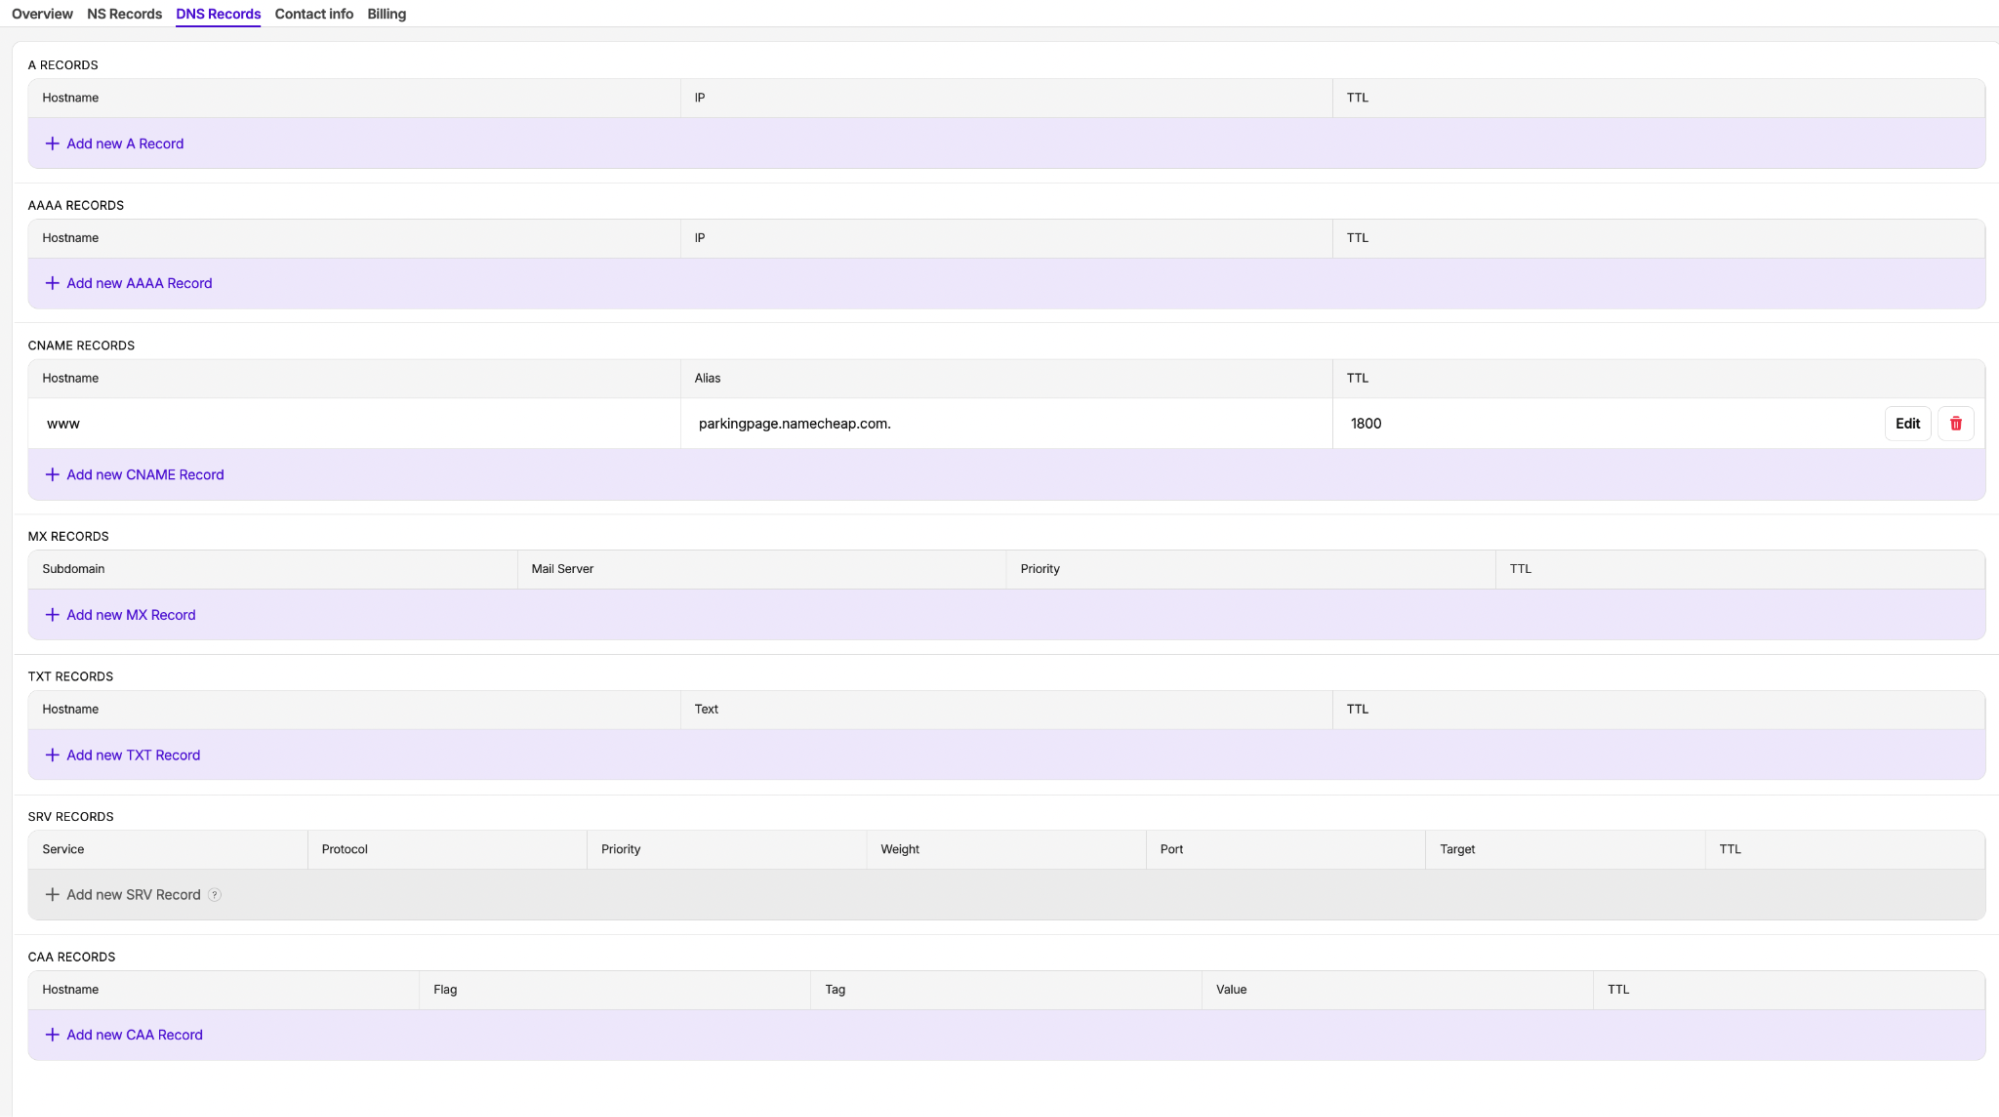
Adding a DNS Record
- Open the DNS Records tab for your domain.
- Scroll to the section for the record type you need (e.g. A RECORDS).
- Click + Add new A Record (or the corresponding type).
- Fill in the required fields.
- Save the record.
ℹ️ Changes may take up to 48 hours to propagate. A reminder notice is displayed in the top right corner of the DNS Records tab.
Field Reference by Record Type
A and AAAA:
- Hostname — subdomain (www, mail) or @ for the root domain
- IP — IPv4 (for A) or IPv6 (for AAAA)
- TTL — cache duration in seconds
CNAME:
- Hostname — the alias subdomain (e.g. www, blog)
- Alias — the target hostname (e.g. parkingpage.namecheap.com)
- TTL — cache duration in seconds
MX:
- Subdomain — usually @ (root domain)
- Mail Server — mail server hostname
- Priority — lower number = higher priority (10 is preferred over 20)
- TTL — cache duration in seconds
TXT:
- Hostname — subdomain or @
- Text — the text value (e.g. v=spf1 include:_spf.google.com ~all)
- TTL — cache duration in seconds
SRV:
- Service — service name (e.g. _autodiscover, _sip)
- Protocol — protocol (_tcp, _udp)
- Priority — lower = higher priority
- Weight — relative weight for load balancing
- Port — port number for the service
- Target — hostname of the server
- TTL — cache duration in seconds
CAA:
- Hostname — subdomain or @
- Flag — 0 (non-critical) or 128 (critical)
- Tag — issue, issuewild, or iodef
- Value — CA domain (e.g. letsencrypt.org) or reporting URL
- TTL — cache duration in seconds
Editing and Deleting Records
- Click Edit next to any existing record to modify its values.
- Click the red trash icon to delete a record.
⚠️ Do not delete records while migrating to a new host — wait until the new setup is confirmed working.
ℹ️ Changes may take up to 48 hours to propagate.
What Is Contact Information?
Every domain must have a contact record with the registrant's details. This data is submitted to the domain registry and may appear in public WHOIS lookups (unless WHOIS protection is enabled).
Contact fields: First Name, Last Name, Country, City, Address, State/Province, Zip/Postal Code, Email, Phone (with country code).
Viewing a Domain's Contact
- My Domains → click on a domain name.
- Open the Contact info tab.
- The assigned contact is displayed with full details.
Editing a Contact
- On the Contact info tab, click Edit contact info or the pencil icon.
- Update the fields in the Edit Contact Information modal.
- Click Save.
ℹ️ If this contact is shared with other domains, changes will apply to all of them. Affected domains are listed at the top of the modal.
Managing All Contacts
The top-level Contacts Info tab (Domains → Contacts Info) shows all saved contacts across your account. From here you can view, edit, delete, and add contacts.
Billing Tab Overview
Shows:
- Next payment amount and renewal cost
- Days remaining until renewal
- Renew for 1 Year Now button
- Auto-renew toggle
- Transaction history table

Transaction History
Column
Description
Date
Transaction timestamp (DD.MM.YYYY, HH:MM:SS)
Type
Transaction type (e.g. Domain registration, Domain renewal)
Amount
Amount charged (negative value, e.g. $-3.00)
Renewing a Domain
- Open the domain from My Domains.
- Go to the Billing tab (or Overview — the button is available in both).
- Click Renew for 1 Year Now.
- Confirm the payment.
✅ Renew before the expiration date to avoid losing the domain. After expiration there is usually a grace period, but recovery may cost more. Enable Auto-renew to have the system handle renewals automatically.
Auto-Renew
The Auto-Renew toggle is available in the My Domains list, on the Overview tab, and on the Billing tab.
- Enabled (purple) — the domain renews automatically before expiration
- Disabled (gray) — you must renew manually
⚠️ Make sure your account balance is sufficient for auto-renewal. If the balance is too low, automatic renewal will fail and the domain may expire.
How do I point my domain to Cloudflare?
- Log in to your Cloudflare account and add your domain.
- Cloudflare will display two nameservers (e.g. aiden.ns.cloudflare.com and hana.ns.cloudflare.com).
- In My Domains → NS Records, replace the existing nameservers with the Cloudflare ones.
- In Cloudflare, click "Done, check nameservers". Propagation can take up to 48 hours.
ℹ️ After switching to Cloudflare nameservers, all DNS records are managed inside your Cloudflare dashboard — not in the DNS Records tab here.
How do I connect my domain to shared hosting (cPanel)?
- Get the nameservers from your hosting provider's welcome email or dashboard.
- In My Domains → NS Records, update both nameservers.
- Wait 24–48 hours for propagation.
Alternative without changing NS — if you want to keep DNS on this platform, add A records in DNS Records → A RECORDS:
- Hostname: @ | IP: [your hosting server IP] | TTL: 1800
- Hostname: www | IP: [your hosting server IP] | TTL: 1800
How do I set up email (Google Workspace, Microsoft 365)?
Add MX records in DNS Records → MX RECORDS. Example for Google Workspace:
Subdomain
Mail Server
Priority
@
ASPMX.L.GOOGLE.COM
1
@
ALT1.ASPMX.L.GOOGLE.COM
5
@
ALT2.ASPMX.L.GOOGLE.COM
5
@
ALT3.ASPMX.L.GOOGLE.COM
10
@
ALT4.ASPMX.L.GOOGLE.COM
10
Also add an SPF record in TXT RECORDS:
- Hostname: @
- Text: v=spf1 include:_spf.google.com ~all
ℹ️ Exact MX record values are provided by your email provider — always use the values from their setup guide.
How do I verify my domain for Google Search Console or another service?
- The service provides a TXT record value (e.g. google-site-verification=abc123).
- Go to DNS Records → TXT RECORDS.
- Click + Add new TXT Record.
- Set Hostname to @ and Text to the provided verification string.
- Save → return to the service and click Verify. Verification usually takes a few minutes.
How do I add a subdomain?
Point a subdomain to a server (A record):
- DNS Records → A RECORDS → + Add new A Record.
- Hostname: blog (or your chosen subdomain), IP: server IP address.
- Save.
Alias a subdomain to another domain (CNAME):
- DNS Records → CNAME RECORDS → + Add new CNAME Record.
- Hostname: blog, Alias: target domain.
- Save.
How do I set up SSL (HTTPS)?
SSL certificates are issued and managed by your hosting provider or CDN (e.g. Let's Encrypt via cPanel, or Cloudflare). To support certificate issuance:
- Make sure your A/CNAME records correctly point to your hosting server.
- Optionally add a CAA record to authorize a specific Certificate Authority (e.g. Tag: issue, Value: letsencrypt.org).
ℹ️ If using Cloudflare, SSL is managed in the Cloudflare dashboard under SSL/TLS settings — no additional DNS records needed here.
How long does DNS propagation take?
Change type
Typical propagation time
NS record change
24–48 hours
A / AAAA record
Up to 48 hours (often under 1 hour with low TTL)
CNAME record
Up to 48 hours
MX record
Up to 48 hours
TXT record
Up to 48 hours
Switch between platform NS modes
Usually within 1 hour
✅ To check propagation in real time, use dnschecker.org or whatsmydns.net — enter your domain and record type. Lowering TTL before making changes speeds up propagation significantly.
My domain shows a ⚠ warning icon in My Domains. What should I do?
The warning icon can appear for the following reasons:
1. Invalid contact information — the contact assigned to this domain has missing or incorrectly formatted fields.
To fix this:
- Click on the domain name.
- Open the Contact info tab.
- Click Edit contact info.
- Fix any invalid fields (phone format, zip code, etc.).
- Click Save.
2. Unverified email address — the domain's email address has not been verified.
To fix this, check your email for a confirmation request and complete the verification.
ℹ️ Some domain registries require accurate contact information and verified email for compliance. An invalid contact or unverified email may prevent domain renewal or transfer.
⚠️ If the warning icon persists after following the steps above, please contact our support team for further assistance.
When to Change Nameservers
When your hosting is with a provider other than the domain registrar (e.g. the domain is registered here but the website is hosted on Hostinger, DigitalOcean, or another provider), you need to point the domain to that provider's nameservers.
How to Change Nameservers
- Get the nameserver addresses from your hosting provider (usually in the format ns1.yourhost.com and ns2.yourhost.com).
- Go to My Domains → click on the domain you want to point.
- Open the NS Records tab.
- Click Edit next to each existing nameserver and replace it with the new one.
- If you need additional nameservers, click + Add New NS Record.
- Save your changes.
ℹ️ You need at least 2 nameservers. Enter only the hostname (e.g. ns1.hostinger.com) — not the IP address. Changes propagate within 24–48 hours.
Pre-Switch Checklist
- Back up your current DNS records — screenshot or copy all A, AAAA, CNAME, MX, TXT, SRV records from the DNS Records tab.
- Set up DNS at the new host first — configure your website, email, and other services at the new provider before switching NS.
- Lower your TTL — if possible, reduce TTL values to 300 seconds (5 minutes) at least 24 hours before the switch to speed up propagation.
- Check email settings — note your MX records and make sure email is configured on the new nameservers before switching.
- Choose the right timing — make the switch during low-traffic hours (e.g. overnight or on weekends).
Reverting to Default Nameservers
To return to managing DNS directly in this platform:
- Go to NS Records for the domain.
- Check the "Use provider's NS" checkbox.
- Save changes.
The domain will be reassigned to the default nameservers provided by your registrar, and the DNS Records tab will become active again
How do I transfer my domain to another registrar?
- Disable WHOIS Protect (some registrars require it to be off during transfer).
- Unlock the domain — look for a Transfer Lock or Registrar Lock setting (contact support if not visible).
- Obtain the EPP/Authorization code from the Billing or Overview section.
- Initiate the transfer at the receiving registrar and enter the authorization code.
- Confirm the transfer via the email sent to the domain's contact address.
ℹ️ .com, .net, .org and most gTLDs can be transferred 60 days after registration or the last transfer (ICANN policy). A domain transfer extends the registration period by 1 year from the current expiration date.
My domain expired. Can I recover it?
Phase
Typical timeline
What you can do
Grace period
0–30 days after expiration
Renew at the standard price
Redemption period
30–75 days
Recovery possible, higher fee may apply
Pending delete
75–80 days
Recovery not possible
Deleted / released
Day 80+
Available for new registration
⚠️ Timelines vary by TLD. If your domain shows as Expired in My Domains, contact support immediately to avoid losing it.
For further assistance, contact our support team.